
BLOG / ARTÍCULOS DE DREAMWERKS

LED Mirrors vs Regular Mirrors: Are They Worth It or Not?
Let's be honest - most of us don't think too hard about bathroom mirrors. You hang one up, glance at yourself in the morning, and move on. But if you've ever been in a beautifully designed bathroom with a sleek, glowing mirror and thought, "okay, that's kind of amazing," you already know the feeling we're talking about. Right now, the LED mirror is having a serious moment. You see them everywhere - in hotels, home renovation shows, and Instagram bathroom makeovers. But are they actually useful, or just a fancy upgrade you don't really need? That's exactly what we're going to break down in this guide. We'll compare LED mirrors to regular mirrors across every angle that matters - function, style, cost, and everyday use - so you can make the right call for your space and budget. What Is an LED Mirror, Exactly? An LED mirror is a mirror that has LED lights built into it, either around the edges, behind it, or embedded within the mirror surface itself. These lights are typically cool white, warm white, or neutral white, and many models let you adjust the brightness or color temperature depending on your needs. Think of it this way: your standard bathroom vanity mirror just reflects your face. A bathroom mirror with light does that and acts as a dedicated lighting source - all in one piece. No extra fixtures, no guessing if the overhead light is washing you out. They come in all kinds of shapes and sizes. You've got rectangular options, square frames, and then the super popular round LED mirror, which has become a go-to in modern and minimalist bathroom designs. You can find them as wall mirrors that mount flush or even as pivot-style options. Regular Mirrors - Still a Solid Choice? Regular mirrors aren't going anywhere. They're simple, affordable, and they get the job done. A classic bathroom vanity mirror or a set of wall mirrors can look great in the right space, especially if you're going for a traditional or rustic style. Bathroom pivot mirrors are a great example. They tilt and adjust to your angle, which is genuinely useful if you're short, tall, or just like checking different angles when you get ready. They've been a bathroom staple for decades for a good reason. Standard mirrors are also dead simple. No wiring, no switches, no batteries. If the power goes out, your mirror still works. There's something to be said for that. But here's where regular mirrors fall short: lighting. Most bathrooms have overhead lighting, which casts shadows downward across your face. That means you're applying makeup or shaving in less-than-ideal conditions without even realizing it. Good lighting changes everything. LED Mirror vs. Regular Mirror: A Real-World Comparison 1. Lighting Quality This is the biggest win for LED mirrors, hands down. The built-in LED lighting in a bathroom mirror with light provides even, shadow-free illumination right at eye level. That's the sweet spot for getting ready - whether you're putting on mascara, trimming a beard, or just making sure your collar is straight. Regular mirrors rely entirely on your existing bathroom lighting, which is often overhead and unflattering. If your bathroom has poor lighting, a regular mirror won't fix that. Winner: LED Mirror - it gives you the kind of lighting that actually helps. 2. Style and Aesthetics If you want that high-end, spa-like bathroom vibe, LED mirrors are tough to beat. The glow around a round LED mirror or a large rectangular backlit mirror instantly elevates the whole room. It looks intentional and polished in a way that's hard to achieve with a plain mirror. That said, if you have a farmhouse, cottage, or vintage bathroom, luxury bathroom mirrors in traditional finishes - like brass, matte black, or antique silver - can look way more fitting than anything with LEDs. Winner: Depends on your bathroom style. LED wins in modern spaces; traditional mirrors win in classic settings. 3. Price and Budget Let's talk money. A decent regular mirror can cost you anywhere from $20 to $150, depending on size and frame. Simple, no surprises. The best bathroom LED mirrors start around $80 to $150 for basic models, and go up to $400 or more for large, feature-rich options. Luxury bathroom mirrors with built-in dimmers, anti-fog features, and touch controls can run even higher. However, when you factor in that you're essentially replacing a mirror AND a light fixture with one product, the value starts to make more sense. You're simplifying your bathroom setup while getting better lighting. Winner: Regular mirrors on upfront cost. LED mirrors have long-term value. 4. Installation Regular wall mirrors are easy to hang. Most of them just need a couple of anchors and a level - you could do it in 20 minutes on a Saturday morning. LED mirrors need to be wired into your bathroom's electrical system, which usually means hiring an electrician if you don't have an outlet already located near your mirror space. Some plug-in models exist, but hardwired installations look much cleaner. If you're doing a full bathroom remodel, this is the perfect time to add an LED mirror - the electrical work is already being done. If you're just doing a quick refresh, the added installation cost might give you pause. Winner: Regular mirrors for ease of installation. 5. Anti-Fog and Smart Features Here's something a regular mirror absolutely cannot do: defog itself. Many LED mirrors come with a built-in heating pad on the back that prevents fog from building up after a hot shower. If you've ever stumbled out of the shower and had to wipe the mirror with your hand, you know how annoying that gets. Beyond anti-fog, a lot of the best bathroom LED mirrors come with touch-sensitive dimmer switches, color temperature controls (so you can switch between warm light for relaxing and cool light for applying makeup), built-in clocks, Bluetooth speakers, and even magnifying sections. A regular bathroom vanity mirror offers none of that. It reflects. That's it. Winner: LED Mirror by a mile. 6. Durability and Maintenance LED lights are rated for anywhere from 30,000 to 50,000 hours of use. If you use your mirror for about two hours a day, that's potentially 40 to 68 years of light life. You're not going to be replacing bulbs. Regular mirrors can last indefinitely as long as they don't get cracked. There's nothing to break down electrically. But they also don't improve over time - they just keep reflecting. Winner: Tie. Both can last a very long time with basic care. Which One Works Best for Your Bathroom Type? Not every bathroom is the same, and the right mirror depends a lot on your specific setup. • Small bathrooms: A round LED mirror works great here. The circular shape softens a tight space, and the lighting makes the room feel brighter and larger without adding extra fixtures. • Double vanity bathrooms: Two large bathroom vanity mirrors with LED lighting on either side of a double sink look stunning and very intentional. This is where LED mirrors really earn their place. • Guest or half bathrooms: A simple, stylish wall mirror is often fine here. Guests don't need anti-fog or dimmers - they just need to see their reflection. • Master bathrooms: This is your space for luxury bathroom mirrors. If there's ever a room worth investing in, it's the one you use every single day. A large LED mirror here pays off in daily comfort and home value. • Adjustable-angle needs: If you need to tilt your mirror to see different angles, bathroom pivot mirrors are still a great functional option, and some LED pivot models now exist, too. Most Popular LED Mirror Styles Right Now Round LED Mirror A round LED mirror is probably the most popular pick right now, and it makes sense why. The circle shape feels organic and relaxed, which balances out the hard angles you often find in modern bathrooms - square tiles, rectangular sinks, straight lines everywhere. Add some backlit glow, and you've got a focal point that people notice instantly. Rectangular Backlit Mirror These are ideal over double vanities or in bathrooms with a more structured, architectural look. A long rectangular LED mirror over a wide bathroom vanity mirror space looks clean, upscale, and hotel-inspired. If you're going for that high-end feel, this is the format to go with. Frameless LED Wall Mirrors Frameless wall mirrors with backlight are perfect for minimalist bathrooms where you want the mirror itself to disappear and only the light to show. They look incredible in all-white or neutral-toned bathrooms. So, Are LED Mirrors Worth It? Here's the bottom line: if you care about good lighting when you get ready, want to upgrade how your bathroom feels, and are okay with a slightly higher upfront cost, yes - an LED mirror is absolutely worth it. They're especially worth it in master bathrooms and primary vanity areas where you spend real time getting ready every day. The combination of built-in lighting, clean design, and features like anti-fog makes them genuinely functional, not just decorative. That said, a standard mirror is still a completely solid choice for guest bathrooms, rentals, or spaces where simplicity and budget are the main priorities. The best bathroom LED mirrors shine brightest in the rooms where people actually use them daily. If you're on the fence, consider starting with a single round LED mirror in your main bathroom. It's a low-commitment way to experience the difference. Chances are, once you've gotten ready with good, even, face-level lighting, going back to a plain wall mirror and harsh overhead light is going to feel like a real step backward. Your bathroom is a space you use every single day. A little upgrade there can genuinely change how your mornings feel - and that's worth something.
Leer másBLOG / ARTÍCULOS DE DREAMWERKS

What you need to know while buying bathroom fixtures online?
Let’s be real. Nobody wants to deal with a broken shipment two days before a bathroom remodel is supposed to wrap up. Whether you’re hunting for the best bathtub for a master suite refresh or trying to pull together a complete look around a durable countertop, buying fixtures online takes some know-how. The process is different from walking into a showroom, touching things, and loading them into your truck. This post covers the full picture - what to check before buying, how shipping actually works for big fixtures, how to handle returns without losing your mind, and what warranties actually mean in the fine print. Why So Many People Shop for Bathroom Fixtures Online Online shopping for bathroom fixtures has exploded over the last decade. Home improvement projects boomed, showrooms closed during lockdowns, and honestly, the prices online are just hard to beat. You can find a bathroom vanity for half the price of a showroom model, or pick up luxury bathtubs that your local store doesn’t even carry. Beyond price, online stores give you access to a massive range of styles. Whether you’re going for a sleek modern look with glass shower doors or a farmhouse feel with a freestanding tub, the options are almost unlimited. You can filter by size, finish, material, and price - and compare a dozen products in ten minutes. But that convenience comes with a catch: you can’t feel the weight of the glass, check if the finish is consistent, or ask a salesperson to explain the warranty on the spot. That’s why doing your homework before you buy is so important. Why Online Is the Smartest Way to Shop for Bathroom Fixtures Today The online bathroom market has matured significantly over the past decade. What used to be a risky space full of misleading product photos and unreliable sellers is now home to established retailers offering everything from entry-level essentials to luxury bathtubs with spa-level features. You can find the exact bathtub shape that suits your floor plan, a bathroom vanity that matches your cabinetry, or a complete shower kit built to your bathroom dimensions - all without setting foot in a showroom. For homeowners doing a full renovation, online shopping allows you to coordinate every element - wall panels, glass shower doors, bathroom mirrors, and more - from a single source or across multiple specialty retailers. For first-time buyers who are furnishing a bathroom from scratch, it levels the playing field entirely, putting the same products available to interior designers right at your fingertips. That said, the buying process for bathroom fixtures is meaningfully different from ordering everyday items online. The stakes are higher, the products are heavier, and the policies are stricter. Understanding the full purchase journey before you buy is not optional - it is essential. Do Your Homework Before You Add Anything to Your Cart The most common and most preventable mistakes in online bathroom shopping happen before the purchase is even made. Skipping the research phase leads to wrong-size orders, mismatched finishes, and products that simply do not work in your space. Measure Everything - Twice Precise measurements are non-negotiable. Know your rough-in plumbing dimensions, your shower opening width for shower doors, your ceiling height for wall panels, and the available floor space for any freestanding or alcove tub. A bathroom vanity that is even two inches off from your wall space is unusable, and return shipping on a piece that large will cost you significantly. Measure twice, order once - that is the professional standard. Read Product Listings Like a Professional Online product listings are written to sell, not always to inform. A shower kit listing might include the base and walls, but not the door. Shower glass doors may show chrome hardware in the photo, but ship with a different finish. A bathroom mirror listing might not mention that mounting hardware is sold separately. Always read the full product description, the "what is included" section, the dimensions table, and the installation requirements before purchasing. If anything is ambiguous, call the retailer's customer support line and get clarification in writing. Verify Compatibility With Your Existing Plumbing and Layout First-time buyers in particular often underestimate how much existing plumbing constraints affect their options. The drain location, water supply line positions, and wall stud spacing all determine which products will actually work in your bathroom without requiring expensive modifications. Before selecting shower kits, shower tub doors, or a freestanding tub, confirm these measurements with a licensed plumber if you have any doubt. Selecting the Right Bathtub: Shape, Style, and Material The tub is typically the highest-investment piece in any bathroom project, and getting this decision right matters both functionally and aesthetically. Understanding Bathtub Shape and How It Affects Your Space Bathtub shape is one of the first decisions you will need to make, and it has real implications for your floor plan and installation process. Alcove tubs are the most prevalent in American homes, designed for three-wall enclosures and optimized for space efficiency. Freestanding tubs - whether oval, slipper, or double-ended - serve as architectural focal points and work best in larger bathrooms with adequate floor clearance around the perimeter. Drop-in tubs require a custom-built deck or platform, which adds installation complexity. Corner tubs are engineered specifically for angular spaces and are a smart solution when you are working with an unconventional layout. If you are drawn toward the premium end of the market, luxury bathtubs offer elevated design in a range of shapes - but always confirm the bathtub shape works within your actual floor plan before committing to a specific model. Choosing the Best Bathtub Material for Long-Term Value Material selection directly affects durability, heat retention, installation requirements, and long-term maintenance. Acrylic is the most widely used material in American homes - it is lightweight, affordable, and comes in a wide range of colors and shapes. Cast iron remains the gold standard for heat retention and longevity, but it is extremely heavy and requires reinforced floor support. Stone resin has gained significant traction in the luxury segment, offering excellent heat retention and a premium aesthetic at a higher price point. When evaluating the best bathtub for your specific project, balance the upfront cost against installation requirements, floor load capacity, and expected lifespan. The cheapest option on the product page is rarely the most cost-effective choice when you factor in everything. Shower Fixtures: Making the Right Call on Doors, Glass, and Complete Kits Shower fixtures represent one of the most searched and most frequently misunderstood categories in online bathroom shopping. Getting these selections right requires understanding both the aesthetic and functional requirements of your specific installation. Shower Doors: Framed vs. Frameless and Why It Matters The debate between framed and frameless shower doors is ultimately a conversation about budget, maintenance, and visual preference. Frameless shower glass doors have dominated the design conversation in recent years because they create a clean, open look and are significantly easier to clean - there are no metal channels where soap scum and mildew can accumulate. They are, however, more expensive and require precise installation to ensure a proper seal. Framed options still deliver excellent performance at a lower price point and are more forgiving during installation. For a combined tub-shower space, shower tub doors are typically the most practical choice - sliding panels eliminate the clearance requirements of a swing door in a confined area. When shopping for glass shower doors online, verify the glass thickness (standard is 3/8 inch; premium is 1/2 inch), the hardware finish, the door swing direction, and whether the unit ships with all necessary mounting hardware included. When Shower Kits Are the Smarter Investment For homeowners doing a full shower replacement - and especially for first-time buyers who are not sure how to source each component individually - shower kits offer a compelling advantage: every component is engineered to work together. Most shower kits include the shower base, wall surrounds, and sometimes the door, all pre-matched in dimension and finish. This eliminates compatibility issues and simplifies installation considerably. The trade-off is reduced design flexibility. If you want a highly customized look, you will likely need to source individual components. But for a clean, professional result in a standard bathroom footprint, quality shower kits deliver reliable value and are well worth considering. Wall Panels, Vanities, and Mirrors: Getting the Details Right The secondary fixtures and surfaces in your bathroom do as much work as the primary ones when it comes to the final result. Do not treat these as afterthoughts. Wall Panels as a Smart Alternative to Traditional Tile Wall panels have become a serious contender in both renovation and new-build projects across the country. They install faster than tile, require no grout maintenance, and have become available in high-quality finishes that convincingly replicate marble, stone, and wood aesthetics. For a homeowner on a renovation timeline, wall panels can cut installation time dramatically while still delivering a polished, design-forward look. When purchasing wall panels online, confirm the panel dimensions, the required adhesive or trim system, and whether professional installation is recommended or required. Some panel systems are genuinely DIY-accessible; others are not, and the product listing will not always be upfront about that. drain placement compatibility and the plumbing rough-in location before ordering. The Bathroom Mirror: More Than Just a Functional Piece A well-chosen bathroom mirror does two important things: it reflects light to make the space feel larger and brighter, and it reinforces the design direction you have established with the rest of your fixtures. Frameless mirrors work well in modern and minimalist spaces. Framed mirrors add warmth and definition in transitional or traditional bathrooms. LED-backlit mirrors have become a functional upgrade that many homeowners find invaluable for task lighting during grooming. When ordering a bathroom mirror online, verify the mounting requirements carefully. Some larger mirrors must be anchored directly into wall studs, and if your stud spacing does not align with the mirror's mounting points, you will need wall anchors rated for the mirror's weight. This is information you want before delivery day, not after. Shipping Large Bathroom Fixtures: What the Process Actually Looks Like This is the area where most first-time online buyers are caught completely off guard. Bathroom fixtures are not shipped like standard consumer products. Items like tubs, vanities, and shower kits move via freight carriers - also known as LTL (less-than-truckload) shipping - and the experience is fundamentally different from having a package left at your door. Understanding Freight Delivery and Your Responsibilities Standard freight delivery means the carrier brings your item to the curb or the end of your driveway - period. They are not contractually obligated to bring it inside, upstairs, or into a specific room. If you need interior delivery, threshold delivery, or room-of-choice placement, you will need to request and pay for an upgraded service tier, sometimes called white-glove delivery. Budget for this in advance if your bathroom is on an upper floor or requires navigating narrow hallways. Have at least two people available on delivery day for any large fixture. Cast iron tubs, in particular, can weigh several hundred pounds. Do not assume you can manage alone. Inspect Every Shipment Before Signing - No Exceptions This is one of the most important rules in online bathroom fixture purchasing. Before the delivery driver leaves, open and inspect every item. Check glass shower doors for chips or cracks. Inspect the tub surface for impact damage. Examine the vanity cabinet for crush damage at the corners. If anything is damaged, note it explicitly on the delivery receipt before you sign. Take time-stamped photos of everything. Without documented damage noted at delivery, your ability to file a successful freight damage claim drops significantly. Plan for Lead Times That Are Longer Than You Expect Many bathroom fixtures are manufactured overseas or held in regional distribution centers. Even items listed as in-stock can take two to four weeks to arrive once freight processing and scheduling are factored in. If you are coordinating with a contractor, always add buffer time to your delivery estimates. A project that stalls because fixtures have not arrived on schedule is both costly and avoidable with proper planning. Return Policies: Read the Fine Print Before You Buy Return policies for bathroom fixtures are considerably more restrictive than the generous policies you may be accustomed to from general retail. Understanding the specific terms before purchasing is essential - not optional. The Key Policy Terms to Verify Before Every Purchase Before completing any bathroom fixture purchase online, confirm these terms explicitly: the return window (typically 30 to 90 days, but it varies), whether restocking fees apply (industry standard is 15 to 25 percent of the purchase price), who bears the cost of return shipping (freight returns can run $100 to $400 or more), and whether the item can be returned at all once unboxed or installed. Some retailers categorically exclude installed products from return eligibility, which is a policy that has significant implications if you discover a defect during installation rather than at delivery. For items like shower tub doors, glass panels, and wall-mounted mirrors, damage during return transit is a genuine risk. Keep the original packaging intact throughout your installation planning period. If a return becomes necessary, you will need it. Our Orders typically ship within 3-5 business days. Small packages arrive via UPS or FedEx in 3-4 days, while larger freight items like vanities and bathtubs generally arrive within 7-10 business days, depending on your location. When Damage Claims and Returns Intersect If an item arrives damaged and you documented it properly at delivery, most reputable retailers will either arrange a replacement shipment or issue a full refund. The process typically involves submitting your photos, the noted delivery receipt, and an order number through the retailer's claim process. Response times vary - some retailers resolve claims within 48 hours; others take several weeks. Always initiate claims immediately rather than waiting, as most retailers have claim-filing deadlines ranging from 24 to 72 hours after delivery. Warranties on Bathroom Fixtures: What Is Covered and What Is Not Warranty coverage is a critical factor in evaluating the long-term value of any bathroom fixture purchase, and it is one of the most overlooked elements in the buying process. Understanding the types of warranties available - and their limitations - protects your investment for years beyond the purchase date. Structural vs. Finish Warranties: Know the Difference Most bathroom fixture manufacturers offer two distinct types of warranty coverage. The structural warranty covers defects in materials and workmanship - cracks in the tub shell, failures in the door mechanism, and delamination of the vanity cabinet. Premium brands, particularly in the luxury bathtubs segment and high-end shower kits category, often offer lifetime structural warranties on their core products, which represents meaningful long-term value. The finish warranty is separate and typically shorter. Chrome and brushed nickel finishes on shower doors, faucets, and hardware are commonly warranted for one to five years, depending on the brand tier. Finish warranties generally do not cover wear from abrasive cleaners, water mineral deposits, or damage from improper care. Read the fine print on both warranty types before purchasing, especially for items you expect to last the lifetime of a renovation. What Voids a Warranty - and How to Protect Yours Improper installation is the single most common reason warranty claims are denied. Many manufacturers require installation by a licensed plumber or contractor as a condition of coverage. If you are completing a DIY installation, read the warranty terms carefully to understand whether self-installation voids your coverage. Using unauthorized parts, modifying the product, or using incompatible cleaning products can also result in denied claims. To protect your warranty from the moment of purchase: register your product with the manufacturer immediately (most have online registration portals and require registration to activate full warranty coverage), keep your purchase receipt and order confirmation, retain the product model number and serial number, and file documentation in a place you can access it years from now. This applies to every fixture you purchase - tub, vanity, bathroom mirror, shower doors, and all hardware. Expert-Level Tips for a Smooth Online Purchase Experience The homeowners and first-time buyers who have the smoothest experiences with online bathroom fixture purchases share a few consistent habits. These are the practices worth adopting. Buy from established retailers with verifiable customer support. Confirm they have a working phone number, a physical business address, and a transparent return and warranty policy posted on their website. A company that is difficult to reach before the sale will be nearly impossible to work with after a problem arises. Prioritize reviews that describe the post-purchase experience - delivery condition, damage claim resolution, and whether customer service was responsive and professional. A product with a 4.5-star rating built on installation simplicity reviews is very different from one that scores 4.5 because of consistent delivery quality and responsive after-sales support. Coordinate your deliveries strategically. If you are ordering a bathroom vanity, wall panels, glass shower doors, a bathroom mirror, and shower kits from different retailers, map out the installation sequence and stagger deliveries accordingly. Having everything arrive simultaneously before your contractor is scheduled is not a logistics win - it is a storage problem. Order earlier than you think you need to. Even products marked in-stock can face processing delays, freight scheduling gaps, or customs holds for imported items. Build at least two to three weeks of buffer into your renovation timeline beyond the retailer's stated lead time. If you are working with a general contractor, communicate delivery timelines proactively so that schedule adjustments can be made without penalty. Final Thoughts: Shop Prepared, Protect Your Investment Buying bathroom fixtures online is one of the most practical and value-driven decisions you can make for a renovation or new-home setup. The product selection is unmatched, the pricing is competitive, and the ability to research and compare at your own pace puts you in a far stronger position than walking into a showroom with a limited floor display and a sales representative on commission. But the online advantage only holds if you approach it with the right knowledge. Verify your measurements before every order. Understand the shipping process for large items. Read return policies in their entirety before purchasing. Document everything at delivery. Register your products and keep your warranty records organized. Whether you are selecting the best bathtub to anchor a master bathroom renovation, sourcing coordinated shower kits for a guest bath refresh, or outfitting your very first home with quality, lasting fixtures - the process works best when you treat it like the significant investment it is. Use this guide as your reference at every stage of the purchase journey, and you will be well-positioned to shop smarter, avoid costly mistakes, and end up with a bathroom that genuinely delivers on its potential.

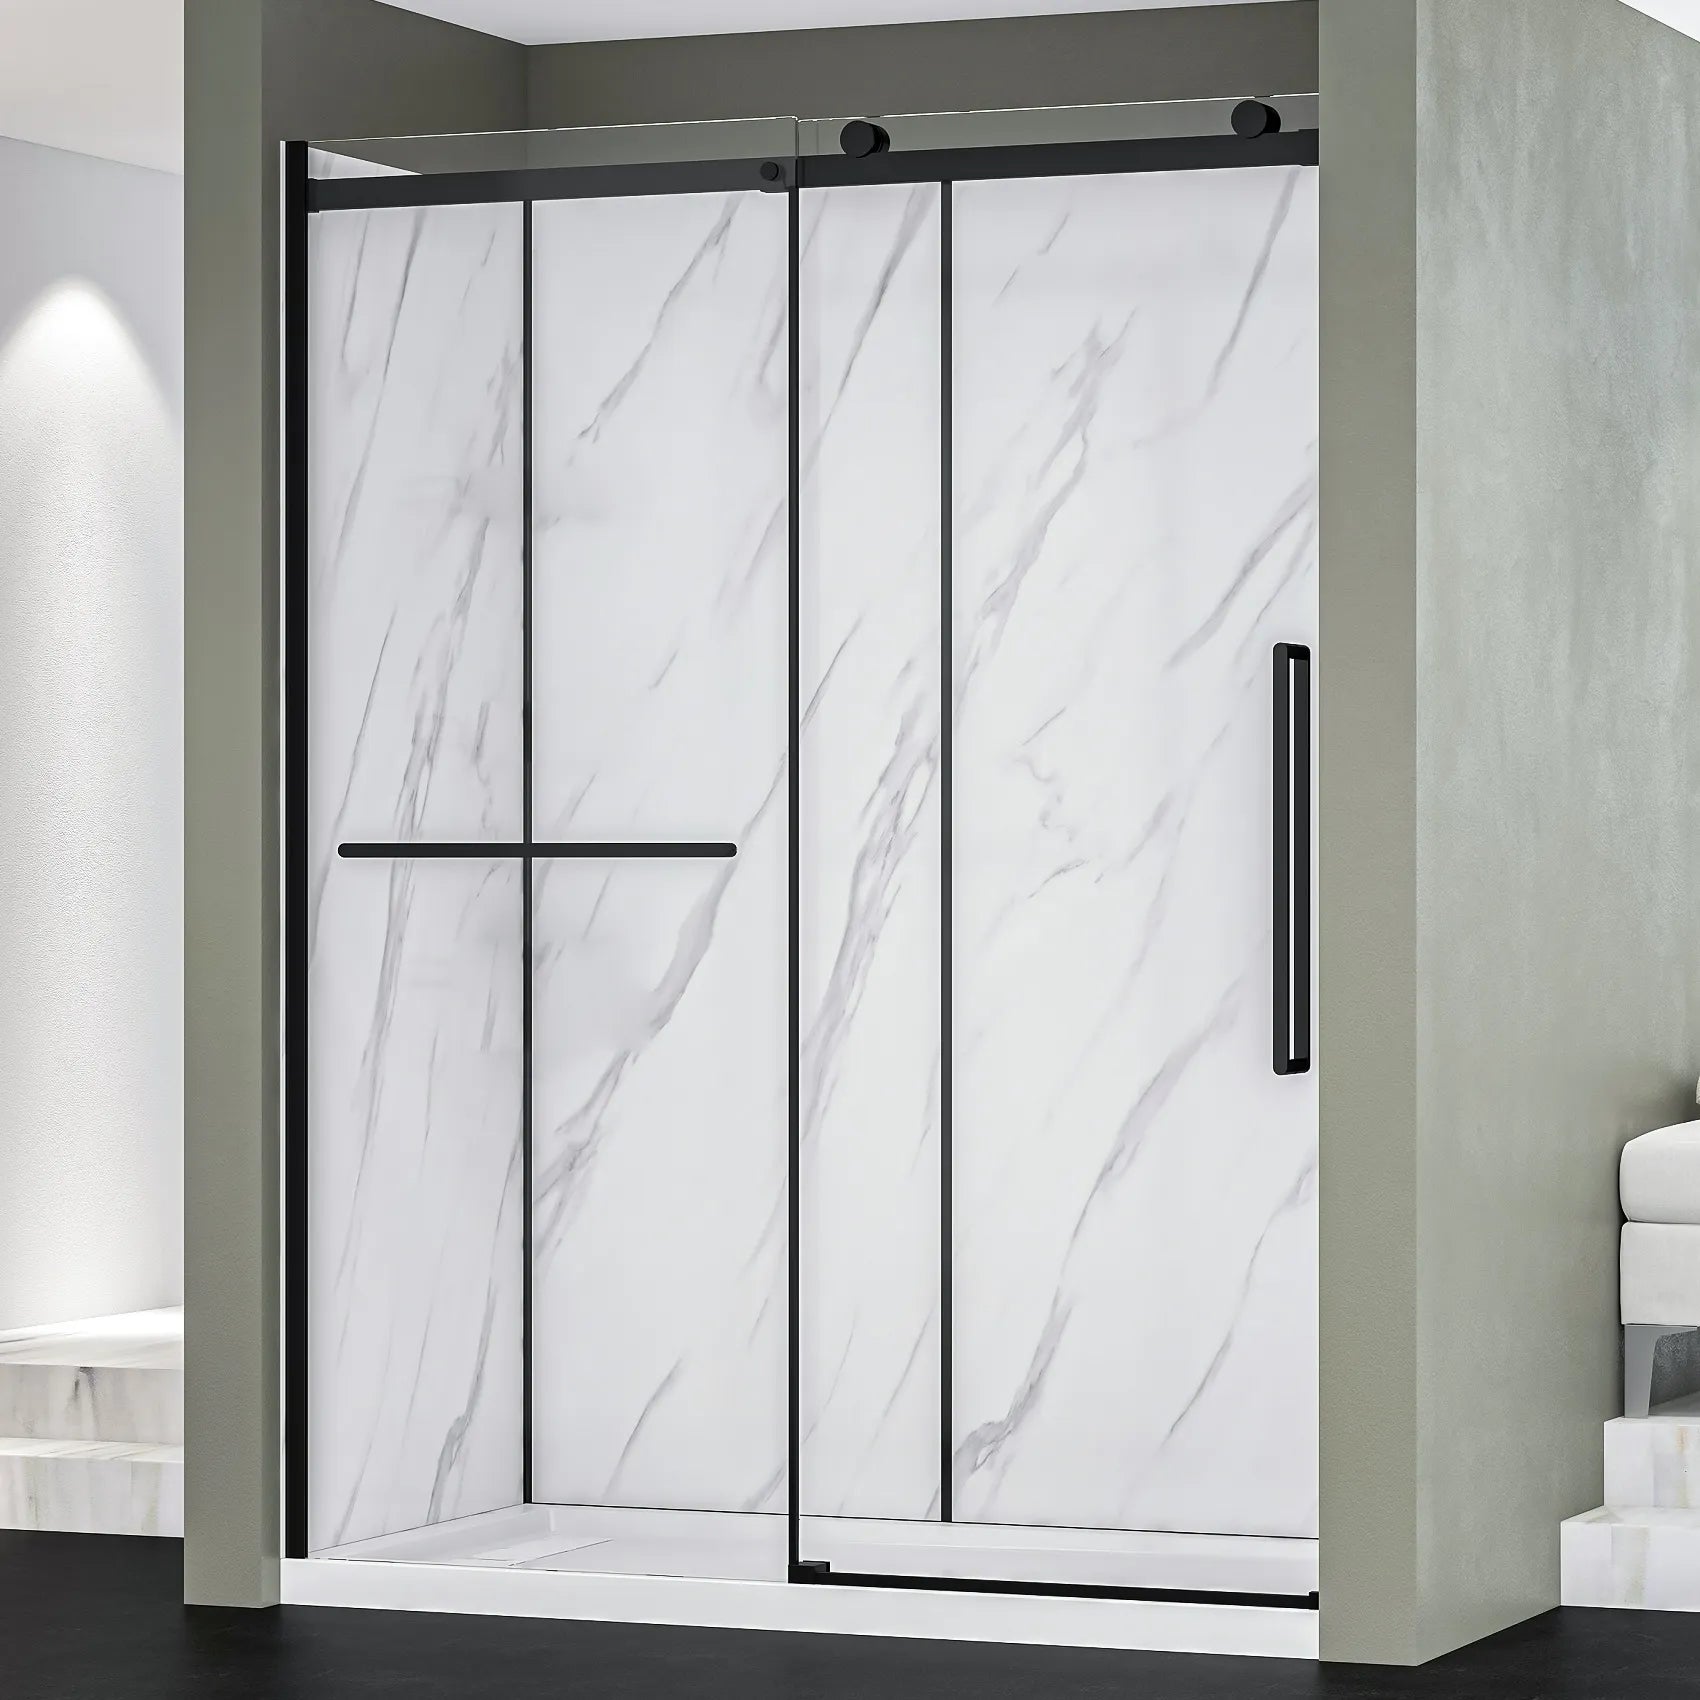
What Is the Most Popular Type of Bathroom Mirror in 2026?
Let's be honest - picking a bathroom mirror sounds simple until you're standing in a store (or scrolling online at midnight) and suddenly realizing there are about fifty different styles, shapes, and features to choose from. If you've been asking yourself which bathroom mirror is actually worth buying in 2026, you're not alone. People all over the country are upgrading their bathrooms, and the mirror market has completely transformed over the last few years. In this guide, we're going to break it all down - no jargon, no confusing specs. Just a real look at what's trending, what's worth the money, and what might be the right pick for your home. Why the Right Bathroom Mirror Actually Matters A lot of people treat mirrors as an afterthought. You slap one on the wall above the sink and call it a day. But the truth is, a good bathroom mirror can completely change how your space looks and feels. It affects the lighting, the vibe, and, honestly, how you feel getting ready in the morning. In 2026, homeowners are way more intentional about this. Whether you're building a brand-new bathroom or just giving your current one a refresh, the mirror is one of the first things people notice. And with so many cool options out there - from basic frameless glass to full-on smart mirrors - there's genuinely something for every budget and style. The Most Popular Bathroom Mirror Styles Right Now So what's actually flying off shelves in 2026? Here's an honest look at what people are buying and why. 1. LED Mirror - The Clear Fan Favorite If there's one style that has completely dominated bathroom design in recent years, it's the LED mirror. These mirrors have built-in LED lighting around the edges or behind the glass, and people absolutely love them. The lighting is even, bright, and makes applying makeup or shaving so much easier. The LED mirror isn't just popular because it looks great (though it definitely does). It's popular because it's practical. You get consistent lighting that doesn't cast weird shadows on your face - something overhead bathroom lights notoriously fail at. Most LED models also let you switch between warm and cool light, which is a game-changer. 2. Round Mirror - Simple, Stylish, Everywhere You've probably noticed that round mirrors are absolutely everywhere right now - on Instagram, in design magazines, in showroom displays. There's a good reason for that. A round mirror brings a soft, clean look to a bathroom without trying too hard. It works with modern, boho, farmhouse, and even traditional styles. The round mirror is especially popular in smaller bathrooms because the curved shape creates a sense of openness. It doesn't feel boxy or heavy on the wall. Pair it with some nice sconce lighting on the sides, and you've got a bathroom that looks like it belongs in a boutique hotel. 3. Round LED Mirror - Best of Both Worlds Take the clean shape of the round mirror and add the functionality of LED lighting, and you get one of the hottest bathroom accessories of 2026. The round LED mirror is showing up in bathrooms across the country right now, and it makes total sense. The soft circular glow around the edge looks stunning and gives you that spa-like atmosphere without spending a ton. Whether you go for a small one over a powder room sink or a big statement piece in a master bath, the round LED mirror just works. 4. Backlit Mirror - Subtle and Sophisticated A backlit mirror has LEDs mounted behind the glass, so instead of lighting coming from the edges, you get a soft glow radiating from the back of the mirror against the wall. It looks incredibly sleek and gives your bathroom a high-end, almost moody feel. The backlit mirror is perfect for people who want great lighting without the look being too obvious. It's minimalist, it's clean, and it works really well in modern or contemporary bathroom designs. It also tends to make the room feel bigger, which is always a win. 5. Vanity Mirror with Lights - For Makeup Lovers If you spend any real amount of time doing your makeup or skincare routine, a vanity mirror with lights is probably worth every penny. These mirrors are designed specifically to give you that bright, even, shadow-free light that makes all the difference when you're trying to get your look just right. A good vanity mirror with lights usually comes with adjustable brightness settings and sometimes even color temperature options, so you can see exactly how you'll look in natural daylight, office lighting, or evening ambiance. That's actually super useful when you think about it. Bathroom Mirror with Lights vs Regular Mirror - Is It Worth the Upgrade? This is honestly one of the most common questions people ask, and the answer depends on how you use your bathroom. If you're just brushing your teeth and washing your face, a regular mirror might be perfectly fine. But if you're doing any kind of detailed grooming, makeup, or skincare, a bathroom mirror with lights is a total upgrade. The thing is, bad lighting in a bathroom is one of those problems that seems minor until you realize your foundation looked great at home but completely different everywhere else. Good mirror lighting solves that. And in 2026, LED mirrors have come way down in price, so the barrier to entry isn't what it used to be. Don't Sleep on Anti-Fog Bathroom Mirrors Here's one feature that doesn't get enough attention: anti-fog bathroom mirrors. If you take hot showers (and most of us do), you know the frustration of stepping out and not being able to see anything in the mirror for five minutes while you wait for it to clear up. Anti-fog bathroom mirrors have a small heating element built into the back of the glass that prevents steam from settling on the surface. It's not a luxury feature anymore - it's just genuinely practical. And a ton of the LED and backlit mirror options now come with this feature built in, so you don't have to choose between style and function. Bathroom Vanity Mirrors - Getting the Size Right One thing a lot of people get wrong when shopping for bathroom vanity mirrors is the size. The general rule of thumb is that your mirror should be a few inches narrower than your vanity on each side. So if you have a 48-inch vanity, you'd probably want a mirror somewhere around 44 to 46 inches wide. Height matters too. You want to see your full face without craning your neck or ducking down. For most people, mounting the mirror so the center is around eye level (typically 57 to 65 inches from the floor) works well. Bathroom vanity mirrors come in all kinds of sizes now, so you shouldn't have any trouble finding the right fit. Luxury Bathroom Mirrors - Are They Worth It? Let's talk about the high end for a second. Luxury bathroom mirrors can run anywhere from a few hundred to several thousand dollars, and the features can be genuinely impressive - touchless dimming, built-in Bluetooth speakers, magnifying panels, memory function for your preferred lighting, even voice control. Are luxury bathroom mirrors worth it? If you're doing a full bathroom renovation and want that spa-level experience, absolutely. They add real value to a home, and they're built to last. But if you're on a tighter budget, there are solid mid-range options that give you 80% of the experience for a fraction of the price. It really comes down to your priorities. Smart Mirrors - The Future Is Already Here Okay, this one is genuinely cool. Smart mirrors are mirrors with built-in technology - think touchscreens, Wi-Fi connectivity, integration with your smart home, weather displays, calendar reminders, and even fitness tracking. They look like a regular mirror when they're off, but when you tap the glass or walk up to them, they come alive. Smart mirrors are still more of a premium niche product, but they've gotten way more accessible in 2026. If you're someone who loves tech and wants your bathroom to feel like it's from the future, a smart mirror might be exactly what you're looking for. They're especially popular in new construction homes and high-end remodels. How to Pick the Best Bathroom Mirror for Your Space Alright, so you've seen all the options. How do you actually pick the best bathroom mirrors for your home? Here are a few quick things to think about: Your bathroom style: Modern bathrooms pair great with frameless LED or backlit mirrors. Farmhouse or rustic styles often look better with a wood-framed round mirror. Traditional bathrooms might suit an ornate framed vanity mirror. Your lighting situation: If your bathroom has poor overhead lighting, go for a lit mirror. It will make a bigger difference than almost anything else. Your budget: You can find great mirrors at every price point. Set a realistic number and look for the best features within that range. Your daily routine: If makeup is a big part of your morning, prioritize lighting quality. If you take long, steamy showers, anti-fog is worth having. If you love gadgets, look at smart options. Final Thoughts The bathroom mirror market in 2026 is honestly exciting. There are so many well-made, stylish, and functional options that it can feel overwhelming - but it doesn't have to be. Start with your style, think about your needs, and then look at what fits your budget. If you're looking for a safe, popular choice that most people love, a round LED mirror or a backlit mirror is a great starting point. They look great, they're practical, they work in most bathroom styles, and they're available at a wide range of price points. You really can't go wrong. Whatever you choose, just remember - the right bathroom mirror isn't just a reflection. It's part of how your whole space feels every single morning. mirror

Useful Products & Tools for Installing Dreamwerks Shower Kits
Ready to install a shower kit from Dreamwerks? You're already ahead of the game - Dreamwerks shower kits are designed to make the installation process as straightforward as possible, with model-specific installation manuals, downloadable guides, and installation videos for every unit they make. But even the best-designed shower kits require the right tools and products to install correctly. Whether you're working with complete shower kits, corner shower kits, or shower enclosure kits, having the proper equipment on hand before you start saves time, prevents damage, and gives you a result that looks and performs like a professional installation. This guide breaks down everything - tools, materials, and products - that you'll want on hand for a complete Dreamwerks shower kit installation from start to finish. What Tools Do You Need to Install a Shower Kit? To install a shower kit properly, you need a combination of measuring and leveling tools, drilling and fastening equipment, silicone sealant and adhesive, shimming materials for the base, and safety gear for handling glass panels. The exact list varies slightly by model, so always cross-reference with your Dreamwerks installation manual before starting. 1. Measuring and Leveling Tools Before a single panel goes up or a base gets set, accurate measurement and leveling are everything. This is the stage that determines whether your shower kit installation looks clean and professional - or ends up with gaps, unlevel surfaces, and doors that don't close properly. What you'll need: • Spirit level or digital level (48 inch minimum) - for checking walls and base alignment before and after installation • Tape measure - for confirming rough opening dimensions against your kit's specifications • Plumb bob or laser level - especially useful for corner shower kits where two walls must be perfectly square to each other • Carpenter's square - confirms wall corners are at 90 degrees before you begin attaching wall panels or door frames • Pencil and marking tape - for clearly marking substrate cut lines, screw positions, and drain center points Pro note: Dreamwerks installation manuals for shower enclosure kits call out specific maximum wall thickness tolerances at door mounting points. Measure your finished wall thickness before buying any supplementary materials - you may need to adjust your substrate thickness to stay within spec. 2. Drilling and Fastening Equipment Every shower kit installation involves driving fasteners into walls - whether you're anchoring wall panel support channels, securing door tracks, or fixing the base to the floor. The right drilling setup protects your tile and substrate from cracking and ensures anchors hold long-term. What you'll need: • Hammer drill or rotary drill - needed for drilling into tile, cement board, or masonry • Diamond-tipped tile drill bits - standard drill bits will crack ceramic or porcelain tile; always use tile-specific bits • Screwdriver set (Phillips and flathead) - for assembly of door hardware, channel profiles, and trim pieces • Power drill with driver bits - speeds up fastening of wall channels and base screws considerably • Masonry anchors and wall plugs - for anchoring into tile or cement board where studs are not accessible • Stud finder - critical for locating studs behind your substrate to anchor the heavy door tracks and wall jambs securely Important: For complete shower kits that include both wall panels and door sections, Dreamwerks manuals specify exact screw sizes and anchor types for each component. Do not substitute with whatever you have on hand - mismatched hardware can compromise the structural hold of the door frame over time. 3. Substrate and Wall Preparation Products One of the most important steps when you install a shower kit is getting the substrate right. Dreamwerks wall panels are thin - approximately 3.0 to 3.2 mm - and require a continuous rigid backer to prevent flex and long-term failure. This applies to all their shower kits, from standard rectangular units to corner shower kits. What you'll need: • Exterior-grade plywood (1/2 inch to 3/4 inch) - the recommended continuous backer for wall panels in most Dreamwerks installation manuals • Cement board (max 3/4 inch at door mounting points) - accepted as an alternative in select models; always verify with your specific installation manual • Waterproof membrane or vapor barrier - applied over the substrate before panels in wet zone areas for added moisture protection • Circular saw or jigsaw - for cutting plywood or cement board panels to fit your shower alcove or corner configuration • Sandpaper or rasp - for smoothing cut edges on substrate panels before installation 4. Products for How to Install a Shower Base Correctly Knowing how to install a shower base properly is arguably the most critical step in the entire process. A base that isn't level, isn't sealed correctly, or isn't supported properly will cause drain alignment issues, cracking, and water leakage - problems that are expensive to fix after the fact. Dreamwerks bases are molded from acrylic, fiberglass, or thermoplastic (ABS/PVC, depending on the model). They require specific products to install properly: • Plastic shims (non-compressible) - for leveling the base on uneven subfloors; never use wooden shims in wet areas as they can rot and compress over time • Mortar bed or base support foam - some shower base installations benefit from a mortar bed or pre-formed support foam beneath the base for full contact support • PVC-compatible sealant - for sealing the drain connection and the base perimeter; use a product that stays flexible after curing • 100% silicone caulk (mold-resistant formulation) - for sealing the joint between the base and the wall panels • Drain wrench or pliers with rag padding - for tightening the drain assembly without scratching the base surface 5. Sealing and Finishing Products The difference between a shower kit that lasts 5 years and one that lasts 20 often comes down to how well it's sealed at installation. Every joint, every edge, and every penetration point needs proper treatment. • 100% silicone caulk in matching color - for sealing panel-to-panel joints and panel-to-base joints; neutral cure silicone is best for acrylic and glass surfaces • Painter's tape - for masking clean, straight caulk lines at joints and trim edges • Caulk gun - for smooth, controlled silicone application • Denatured alcohol or surface prep wipes - for cleaning all bonding surfaces before applying silicone; silicone will not adhere properly to dirty or oily surfaces • Plastic trim tools or a wet finger - for smoothing caulk beads to a clean, professional finish • Grout or color-matched caulk - for any tile work around the shower enclosure perimeter 6. Safety Gear - Non-Negotiable for Any Shower Kit Installation Whether you're installing corner shower kits, full shower enclosure kits, or complete shower kits with glass door panels, personal protective equipment is not optional. • Cut-resistant gloves - rated for glass handling when moving wall panels or glass doors • Safety glasses - during all drilling, cutting, and silicone work • Knee pads - for base installation and floor-level work • Closed-toe, slip-resistant footwear - especially important on wet bathroom floors • Dust mask - when cutting cement board, which releases silica dust Quick Reference: Tool & Product Checklist for Dreamwerks Shower Kit Installation • Spirit level (48") + tape measure + carpenter's square • Stud finder + hammer drill + diamond tile bits • Exterior-grade plywood (1/2"–3/4") or cement board for substrate • Plastic shims for shower base leveling • PVC-compatible drain sealant + 100% silicone mold-resistant caulk • Masonry anchors for tile/cement board walls • Caulk gun + painter's tape + surface prep wipes • Cut-resistant gloves + safety glasses + knee pads • Model-specific Dreamwerks installation manual - downloaded before you start Final Thoughts Knowing how to install a shower kit is only half the equation. Having the right tools and products staged and ready before you begin is what separates a smooth one-day installation from a frustrating multi-day project. Whether you're tackling complete shower kits, corner shower kits, or full shower enclosure kits, the categories above cover everything you'll need. Dreamwerks makes the installation process as straightforward as possible with detailed, model-specific guides. But the tools and materials are your responsibility to source. Get them right, follow the manual, and your Dreamwerks shower kit installation will deliver a result that looks great and performs reliably for years to come.

Tips for Installing & Moving a Frameless Sliding Shower Door
Frameless sliding shower doors are one of the most popular choices in modern bathroom design - and for good reason. They bring a clean, open look to any space, work beautifully as shower tub doors, and give bathrooms that high-end, spa-like feel. But as stunning as frameless shower doors are, they come with a unique set of safety challenges that framed doors simply don't. Whether you're installing brand-new glass shower doors or moving an existing unit during a renovation, the weight, size, and fragility of frameless glass demand respect. A single wrong move can result in serious injury, a cracked panel, or a door that never sits or slides correctly again. This guide covers 5 essential safety tips for anyone installing or moving a frameless sliding shower door - from luxury shower doors in a master bath to tub shower doors in a family bathroom remodel. Is It Safe to Install a Frameless Sliding Shower Door Yourself? Yes - with the right preparation, tools, and safety practices, installing or moving a frameless sliding shower door is a manageable project. The key risks are the weight of the glass panels, improper track alignment, and unsecured hardware. Following the 5 safety tips below reduces these risks significantly and helps ensure your shower door operates correctly for years. Tip #1: Never Handle Glass Shower Doors Alone This rule applies to every type of glass shower door - but it is absolutely non-negotiable with frameless sliding shower doors. A standard frameless glass panel can weigh anywhere from 50 to over 100 pounds, depending on glass thickness, and the panels used in luxury shower doors with 10 mm to 12 mm tempered glass are on the heavier end of that range. Tempered glass is strong under normal use but highly sensitive to uneven pressure on its edges and corners. If one person tries to carry or position a large panel solo, the uneven grip creates stress points that can cause the glass to shatter - and when tempered glass breaks, it shatters into hundreds of small fragments. The rule: Always have at least two people handling any glass shower door panel. For larger frameless panels over 60 inches tall, use three people or professional suction cup lifting tools designed for flat glass. Keep hands on the flat faces of the glass - never grip edges or corners bare-handed. Tip #2: Wear the Right Protective Gear - Every Time This one sounds obvious, but it gets skipped more often than you'd think, especially on quick repositioning jobs where someone decides to "just move it a few inches." With frameless shower doors, there is no such thing as a quick, casual adjustment. Before touching any glass shower door panel - whether you're doing a full shower door installation or simply sliding a panel off its track to clean the hardware - make sure everyone involved is wearing the following: • Heavy-duty cut-resistant gloves (rated for glass handling, not standard work gloves) • Closed-toe shoes with slip-resistant soles - glass fragments on a wet bathroom floor are a serious hazard • Safety glasses or goggles - especially during track installation or when drilling into tile • Long sleeves when carrying panels to protect forearms from edge contact This applies whether you're installing high-end luxury shower doors or standard tub shower doors - the glass behaves the same way regardless of price point. Tip #3: Verify the Track and Wall Anchor Points Before Lifting the Glass One of the most dangerous moments in any sliding shower door installation is lifting a heavy glass panel into a track that hasn't been properly secured. If the top track shifts, flexes, or pulls away from the wall while the panel is being positioned, the glass can slide, tip, or fall. Before the glass comes anywhere near the installation area, complete and verify all of the following: • Top and bottom tracks are fully secured to the wall and floor with the correct fasteners - anchored into studs or solid backing, not just tile or drywall • All wall jambs and side profiles are plumb and level - a sliding shower door panel that is even slightly out of square will bind or jump its track • Track screws are fully tightened and checked for any flex or movement • The floor track is sealed and positioned correctly per the installation manual - this is especially critical for shower tub doors where the track spans the tub deck Important: This step is where reading your specific shower door installation manual matters most. The best shower doors - particularly frameless sliding models - have precise tolerances, and the dreamwerks guide will specify exact anchor requirements, screw types, and track alignment procedures for your model. Tip #4: Lift Into the Track - Never Slide From the Side This is a technique tip that directly affects safety. When placing a frameless sliding shower door panel into its track, the correct method is to tilt the panel slightly inward and lift the rollers or hangers vertically into the top track first, then lower the bottom guide into position. The common mistake is trying to slide the panel in from the side of the track opening while holding it near-vertical. This approach puts lateral stress on the glass edge, increases the risk of the panel slipping, and can damage the rollers or track hardware if the panel catches at an angle. For frameless sliding glass shower doors, the safest lifting sequence is: 1. Position both installers on the same side of the glass, one at each end of the panel 2. Tilt the top of the panel slightly toward the top track - maintain control of the angle at all times 3. Lift vertically to engage the top rollers or hanging hardware into the track 4. Lower the bottom of the panel gently until the bottom guide seats correctly 5. Test the slide before releasing full weight This same method applies when you're moving an existing glass shower door - removing a panel for cleaning, resealing, or repositioning during a renovation. Come out the same way you went in: top first, bottom second. Tip #5: Inspect the Glass and Hardware Before and After Every Move Tempered glass used in frameless shower doors - including glass shower doors, shower tub doors, and luxury shower doors - can have invisible micro-fractures from shipping or previous handling. These fractures may not cause immediate failure, but a panel with an undetected edge chip or stress crack can shatter spontaneously under temperature change or minor impact. Before every installation or move, inspect the glass panel in good lighting: • Run gloved fingers carefully along all four edges - feel for chips, nicks, or irregularities • Hold the panel up to natural light and look for any cracks, stress lines, or white-edge damage • Check the corner holes (if any) for micro-fractures radiating outward - these are high-stress points • After installation, check all hardware connections: roller wheels, hangers, and bottom guides should move freely with no binding or grinding Bonus: What Makes the Best Shower Doors Easier and Safer to Install? Not all frameless sliding shower doors are equally easy to handle. When shopping for glass shower doors, these features make installation safer and the finished product more reliable: • Pre-drilled, precision-cut corner holes - reduces drilling on-site, which is a major risk point for glass cracking • Quality roller hardware with smooth, adjustable hangers - easier to seat in track and less likely to bind • Magnetic seals and soft-close stops - reduce impact stress when the door closes • Included model-specific installation manual with clear torque specs and anchor requirements • Serviceable hardware components - so you can replace a worn roller without replacing the entire shower door These qualities apply across the full range - from tub shower doors and everyday sliding shower doors to premium luxury shower doors in high-end bathroom remodels. Final Thoughts Frameless sliding shower doors are a beautiful, durable choice for any bathroom - but they deserve careful handling. The five safety tips above cover the most critical risks: going solo with heavy glass, skipping protective gear, rushing the track installation, using the wrong lifting technique, and missing damage before installation. Follow these steps whether you're working with shower tub doors, glass shower doors in a walk-in enclosure, or the most premium luxury shower doors on the market. The glass doesn't care about the price tag - it responds to how you handle it.

Common Shower Kit Installation Mistakes | How to Avoid Them
Installing a shower kit is one of the most rewarding bathroom upgrades you can make - but it's also one where small mistakes can lead to big headaches. Whether you're renovating a full bathroom or simply replacing an outdated unit, knowing what not to do is just as important as knowing the right steps. This bathroom guide walks you through the most common shower installation mistakes homeowners and contractors make - and exactly how to avoid them. From choosing the wrong substrate for your shower wall panels to skipping the installation manual, we have got you covered. What Are the Most Common Shower Installation Mistakes? The most common mistakes include using the wrong substrate behind shower wall panels, ignoring the installation manual, using mismatched base materials, incorrectly shimming the shower base, and assuming all shower kits have the same panel or glass thickness. Each of these can affect the durability, safety, and appearance of your finished shower. Mistake #1: Skipping the Installation Manual This is the number one mistake - and the most avoidable. Every shower kit is different, and the installation manual is written specifically for your model. Dimensions, substrate requirements, wall thickness limits, shimming instructions - all of it lives in that document. Manufacturers publish installation videos and downloadable manuals for every shower model on their websites. These are model-specific guides, which means what works for one unit may not apply to another. Always follow the manual that matches your exact product. Pro Tip: Download the installation manual before ordering your shower kit. Check substrate requirements and wall thickness specs so your space is already prepped when the kit arrives. Mistake #2: Using the Wrong Substrate Behind Shower Wall Panels Shower wall panels are thin and factory-formed - most are only around 3.0 to 3.2 mm thick (about 1/8 inch). Because of this, the backing you install them on matters enormously. A soft, uneven, or unsuitable substrate will cause panels to flex, crack, or fail over time. The standard requirement is a continuous exterior-grade plywood backer - typically between 1/2 inch and 3/4 inch thick. Some models also accept properly installed cement board, but the finished wall thickness where the shower doors mount must not exceed 3/4 inch. Always check your model's installation manual for the exact substrate specification before you start. What to avoid: Drywall or green board behind shower wall panels. These materials absorb moisture and will eventually cause the panels to separate, warp, or allow mold growth behind the wall. Mistake #3: Assuming All Shower Doors Have the Same Glass Thickness Not all shower doors are built the same, and glass thickness is a spec that many people overlook. Lighter shower door styles typically use 6.0 mm (approximately 1/4 inch) tempered safety glass, while heavier frameless or premium doors use 10 to 12 mm glass (roughly 3/8 to 1/2 inch). This difference affects how the door is mounted, what hardware is used, and how the frame or hinges are positioned. If you're replacing just the door - not the full shower kit - you need to confirm the glass thickness matches the existing hardware. Mixing glass weights with incompatible hardware is a safety risk. Remember: All quality shower doors use tempered safety glass. When in doubt, check the parts figures in your model's installation manual for the exact callout. Mistake #4: Not Leveling and Shimming the Shower Base Properly A shower base that isn't level causes water to pool in the wrong areas, puts stress on the drain connection, and creates visible gaps around the walls. This is one of the most common installation errors - and one of the hardest to fix after the fact. Most shower kit installation manuals specifically emphasize shimming the base until it sits completely level before securing it. This step cannot be skipped. Shower bases are molded from acrylic, fiberglass, or thermoplastic materials like ABS and PVC - materials that are rigid but not self-adjusting. If the floor beneath is uneven, the base will follow the floor unless you correct it with shims. Mistake #5: Substituting the Wrong Drain or Base When a shower kit comes with a base, it includes a specific drain center measurement. Swapping in a different base or drain without verifying the drain center location is a common mistake that results in either a misaligned drain or a base that doesn't sit flush. Always use the base included with your shower kit. If you need to substitute, verify the drain center before purchasing an alternative. Drain components are typically molded from polypropylene or PVC, and base materials are usually acrylic, fiberglass, or thermoplastic - all of which have specific chemical compatibilities with sealants and adhesives. Don't Forget the Rest of the Bathroom: Vanities, Cabinets, and Tubs Shower installation doesn't happen in isolation. If you're doing a full bathroom renovation, you're also likely dealing with vanity cabinets, vanity tops, LED medicine cabinets, and possibly freestanding bathtubs. Each of these has its own installation considerations. Vanities and Vanity Tops Vanity cabinets should be moisture-resistant - look for MDF or composite construction with properly sealed panels. Vanity tops in engineered marble or quartz are typically around 3/4 inch thick. A common mistake is anchoring vanities to drywall alone. Always fasten into wall studs, especially when the vanity top is made from stone or engineered marble. LED Medicine Cabinets LED medicine cabinets with integrated dimming and defogger features require a proper electrical connection - this is not a DIY step unless you are qualified. The good news is that LED drivers and bulbs in quality medicine cabinets are typically serviceable, meaning you can replace components without replacing the entire unit. Always confirm the cabinet is rated for bathroom use and that wiring meets local code. Freestanding Bathtubs Freestanding bathtubs are typically acrylic. A common mistake is using harsh chemical cleaners that damage the acrylic surface. Always use acrylic-safe cleaning products. Also, confirm the floor can support the combined weight of the tub, water, and occupant before installation - freestanding tubs filled with water can be extremely heavy. Quick Reference: Shower Installation Checklist • Read your model-specific installation manual before starting • Confirm substrate: continuous exterior-grade plywood (1/2"–3/4") or cement board per manual • Verify finished wall thickness does not exceed 3/4" at door mounting points • Level and shim your shower base before securing • Use the base and drain included with your shower kit - verify the drain center if substituting • Confirm glass thickness (6 mm for lighter doors, 10–12 mm for frameless) matches hardware • Use moisture-resistant materials throughout - vanity cabinets, substrate, and sealants • Have a qualified electrician handle LED medicine cabinet wiring • Use acrylic-safe cleaners on freestanding bathtubs and acrylic shower bases Final Thoughts A successful shower kit installation comes down to preparation and following your installation manual. Most mistakes happen when people skip specifications, assume one size fits all, or rush through substrate and leveling steps. Take the time to read your model-specific guide, use the right materials, and confirm every measurement before you commit. Whether you are installing a complete shower kit with wall panels and shower doors, or building out a full bathroom with vanities, LED medicine cabinets, and a freestanding bathtub - the details matter. Get them right, and you will have a bathroom that looks great and lasts for years.

Bathroom Guide: Shower Kits and Vanity Installation & Materials
Installing a new shower can feel like a big job - but with the right information, it's actually very manageable. Dreamwerks shower kits are designed to make installation straightforward, even for first-timers. That said, there are a few key steps that make the difference between a shower that looks great and lasts for years and one that causes problems down the line. In this guide, we break down everything you need to know about installing your Dreamwerks shower kit - what's in the box, how to prepare the wall properly, where to place the drain, how to handle panels before installation, and how to seal everything the right way. What Comes in a Dreamwerks Shower Kit? Before you start any installation, it helps to know exactly what you're working with. A standard Dreamwerks shower kit includes everything you need to get a complete, functional shower up and running. Here's what you can expect inside the box: • Shower base or pan • Wall panels • Door and glass • Drain and drain cover • Hardware and fasteners • Shelves or accessories (model dependent) • Installation manual Always go through the full parts list before you begin. If anything is missing or damaged, contact Dreamwerks support before starting. It's much easier to sort this out before the walls are open. Step 1: Prepare the Right Substrate (Wall Backing) This is the most important step that people skip - and it causes the most problems. Dreamwerks wall panels are not meant to be installed directly onto bare studs. You need a solid, continuous backing behind them. Use Exterior-Grade Plywood The recommended substrate is exterior-grade plywood, either 1/2" or 3/4" thick. It should cover the entire wall surface without any gaps - this is what "continuous backer" means. Plywood gives the panels a flat, stable surface to bond to and screw into, preventing rippling and keeping everything tight over time. What About Cement Board? Cement board (like HardieBacker) can be used when you want extra moisture protection - but it's typically installed over the plywood, not instead of it. If you're using cement board, make sure it's properly fastened with corrosion-resistant screws and that all joints are taped. Going straight to cement board without plywood behind it can reduce screw retention and lead to panel movement. Pro tip: Think of plywood as the structural layer,r and cement board as the moisture-protection layer. For most bathroom renovations, plywood alone is sufficient - cement board is a bonus step for high-humidity environments. Step 2: Check Your Drain Placement Before Anything Else Drain placement is one of the most common causes of installation headaches - and it's completely avoidable if you check it before you start. Every shower base has a specific drain center location - the exact spot where the drain sits within the pan. If you're using a different base than the one that came with the kit, or if you're connecting to older plumbing, this measurement needs to match exactly. Here's what to do: • Measure the drain center on your new base from both the back wall and the side wall. • Compare it to the drain location in your existing floor plumbing. • If the numbers don't match, you'll need to adjust your plumbing before the base is set. • Never assume two bases are interchangeable - even small differences (an inch or two) can cause big fitting problems. Taking 10 minutes to confirm drain placement before installation starts can save you hours of rework later. Step 3: Let the Panels Acclimate Before Installing This step surprises a lot of people, but it's important - especially if the panels were stored in a garage, warehouse, or van before installation. Shower wall panels - like most building materials - expand and contract slightly based on temperature and humidity. If you bring cold panels into a warm bathroom and install them right away, they may shift or expand after they're attached, which can lead to gaps, warping, or lifted edges. How to Acclimate Your Panels Properly • Store panels flat-never lean them upright against a wall, as this can cause bowing. • Place them in the room where they'll be installed. • Leave them for 24 to 72 hours before installation begins. • Make sure the room is at its normal temperature and humidity - don't rush this with heaters or fans. It's a simple step that takes no effort - just time. And it makes a real difference in how the finished installation looks and holds up. Step 4: Install the Base and Set It Level Once your plumbing is confirmed and your substrate is ready, you can set the shower base. Leveling is critical here - an uneven base affects how water drains, how the door seals, and how the panels sit on top. Use a spirit level across the base in multiple directions. Shim under the base as needed until it's perfectly flat. Once it's level, connect the drain according to the manual - this usually involves a flange seal, a rubber gasket, and the drain cover. Use butyl tape or the manufacturer-recommended gasket for the flange to ensure a watertight connection. Step 5: Attach the Wall Panels Correctly With the substrate ready and the base set, it's time to put up the wall panels. The installation manual for your specific Dreamwerks model will show the exact order and layout - always follow that guide for your model. Here are the key principles that apply across most kits: Adhesive Selection Use a polyurethane or MS-polymer (hybrid) construction adhesive - products like Loctite PL Premium or SikaBond work well. These bond well to both plywood and plastic panels, and they stay flexible after curing, which is important in a wet environment. What to Avoid • Solvent-based adhesives - these can cloud, soften, or damage acrylic, ABS, or PVC panels. • Acetoxy (acid-cure) silicones - they have a vinegar smell and can damage metal finishes over time. • Permanent marine adhesives like 3M 5200 - these make future panel removal nearly impossible. Fasteners Use stainless steel or corrosion-resistant screws as specified in your manual. Don't overtighten - particularly near cement board edges, as overdrive can crack the backer. Use washers or trim caps where the manual calls for them. Step 6: Seal Every Joint for a Watertight Finish Sealing is the last step - and one of the most important. Even the best installation will develop leaks over time if the sealing isn't done right. Use the Right Silicone Always use 100% neutral-cure silicone that is specifically mildew-resistant. This type of silicone does not release acetic acid (the vinegar smell), so it won't corrode metal hardware or finishes. You can find mildew-resistant neutral-cure silicone at any hardware store - just check the label before buying. Where to Seal • All butt joints between panels (where two panel edges meet) • All perimeter transitions - where the panels meet the ceiling, floor, or adjoining walls • The wall-to-base transition - this is where most leaks happen if skipped • Around any cutouts for niches, shelves, or fixtures Apply a smooth, consistent bead of silicone and use a caulk finishing tool (or a damp finger) to press it into the joint. Let it cure fully - usually 24 hours - before running water. Tip: Tape the edges of the joint with masking tape before applying silicone for a clean, professional line. Peel the tape while the silicone is still wet. What Are Dreamwerks Shower Kit Parts Made From? One of the most common questions customers ask is about materials - what the panels, base, and doors are actually made of, and how thick they are. Here's a straight breakdown. Wall Panels Dreamwerks shower wall panels are typically made from PVC, ABS, acrylic, or cultured marble-style composite materials. All are engineered to be water-resistant and easy to clean. Most wall panels in the Dreamwerks range are approximately 3.0 to 3.2 mm thick (roughly 1/8") - though this varies by model, so always check your specific model manual for exact specs. Shower Bases and Pans Shower bases are molded from acrylic and fiberglass or high-density thermoplastic (ABS/PVC), depending on the model. These materials create a rigid, waterproof pan that resists cracking and holds up well over time. Drain covers and drain flanges are typically polypropylene or PVC, with rubber or butyl gaskets for a long-lasting watertight seal. Shower Doors and Glass All Dreamwerks shower doors use tempered safety glass. The thickness varies by style: • 6 mm (approximately 1/4") for lighter framed door styles • 10 to 12 mm (approximately 3/8" to 1/2") for heavier frameless or premium doors Door hardware - rails, handles, hinges - is aluminum or stainless steel, available in Black, Chrome, or Brushed Nickel finishes. All hardware is corrosion-resistant and matched to the kit finish. Trim, Hardware, and Small Fittings Trim pieces and hardware come in Brushed Nickel, Chrome, or powder-coated aluminum/steel. Drain covers and flanges are stainless steel or plated metal. Seals and gaskets throughout the kit are typically 3 to 5 mm rubber or butyl - small parts, but important for keeping water where it belongs. Shelves and Accessories Shelves are either tempered glass or molded plastic, depending on the model. Both options are designed for a wet environment and are easy to wipe clean. What Are Dreamwerks Vanities and Vanity Tops Made From? Dreamwerks vanities are built for the bathroom environment, which means moisture resistance is baked into every part of the design. Vanity Cabinets Cabinet boxes are constructed from moisture-resistant engineered materials - either Hi-Tek or composite cabinetry, or sealed MDF with waterproof finishes. These materials are specifically chosen to handle bathroom humidity without warping or swelling over time. Higher-end models in the range use solid wood or veneered construction with water-resistant topcoats. Vanity Tops Dreamwerks offers several vanity top materials depending on the collection: • Engineered marble - durable, consistent in appearance, easy to maintain • Cultured marble - a classic look with good water resistance • Ceramic - practical and affordable • Carrara marble - a premium natural stone option for a high-end finish Most standard vanity tops are 3/4" (0.75") thick, which gives a clean, modern profile and solid structural strength. Many tops come with integrated or undermount sinks already built in, so you get a seamless, easy-to-clean surface right out of the box. LED Medicine Cabinets, Mirrors, and Lighting Dreamwerks LED medicine cabinets do a lot more than just store things. Here's what you get with most models in the range: • Integrated LED lighting built directly into the cabinet frame • Dimmable color temperature - adjust from warm to cool light depending on your preference or the time of day • Built-in anti-fog or defogger function - no more wiping the mirror after a hot shower • Touch button or touch strip controls for all lighting and fog functions • Internal tempered glass shelves for storage • Soft-close hinges for a quiet, premium feel The LED modules and drivers are serviceable - meaning if a component needs replacing down the line, you can get the part and swap it out rather than replacing the whole cabinet. All LED medicine cabinets come with a 1-year limited warranty covering defects. If you're choosing between a standard mirror and an LED medicine cabinet, the cabinet gives you built-in storage, better lighting for grooming, and the anti-fog feature - all in one unit. Freestanding Bathtubs Freestanding bathtubs in the Dreamwerks collection are made from high-quality cast or reinforced acrylic. Here's why that material works well for a freestanding tub: • Lightweight - easier to move and install compared to cast iron or stone resin • Glossy finish - looks clean and is easy to wipe down • Good thermal retention - acrylic holds heat well, so your water stays warm longer • Rigid and durable - reinforced bases or composite supports are used on certain models for added strength Acrylic tubs should be cleaned with acrylic-safe, non-abrasive cleaners. Avoid harsh scrubbing pads or chemical solvents, as these can dull the surface over time. Dreamwerks freestanding tubs are designed to be the centrepiece of a bathroom - the combination of a glossy shell, a clean silhouette, and solid build quality makes them a strong choice whether you're doing a full bathroom renovation or replacing a single fixture. Tools You'll Need for Installation Before you start, make sure you have all the right tools ready. Here's a practical list: • Spirit level and chalkline for checking flat walls and marking panel lines • Straight edge for checking substrate flatness • Cordless drill for fasteners and any cutouts • Jigsaw for niche cutouts, drain openings, and fitting around fixtures • Silicone gun and caulk finishing tools for applying and smoothing the silicone • Shims for leveling the base • Tape measure for drain placement and panel layout For heavier panels and the base, having a second person makes the job much easier and safer. Don't try to lift or maneuver large panels alone. Quick Installation Checklist Use this as a final pre-install and post-install check: • All kit parts accounted for-check against the parts list in the manual • Plywood backer installed-continuous, 1/2" to 3/4" exterior grade • Drain center measured and confirmed against floor plumbing • Panels stored flat and acclimated 24–72 hours in the installation room • Base set and leveled shims in place, drain connected with gasket/butyl seal • Wall panels installed per model-specific manual, correct adhesive used • All joints sealed with neutral-cure, mildew-resistant silicone • Silicone allowed to cure fully before using the shower (minimum 24 hours) Final Thoughts Installing a Dreamwerks shower kit doesn't have to be complicated, but it does require doing a few things in the right order. The biggest mistakes people make are skipping the plywood backer, not acclimating the panels, and rushing past the sealing step. Get those right, and the rest of the installation will go smoothly. Every Dreamwerks shower model comes with a downloadable installation manual and video guide at dreamwerks.com. Always use the guide specific to your model number, panel layouts, fastener specs, and cutout dimensions vary between kits.
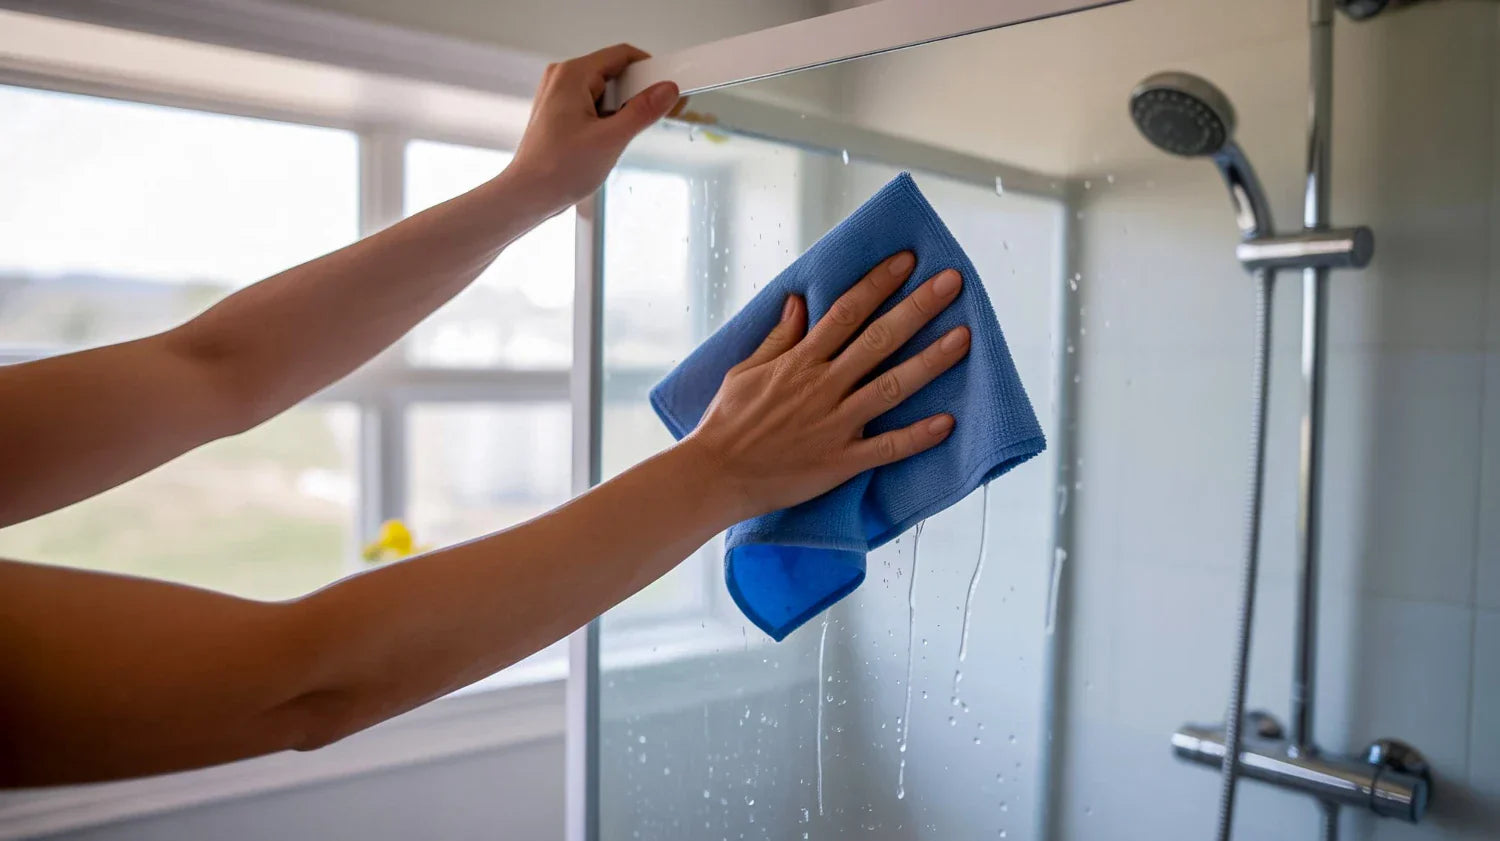
How to Clean Glass Doors: Best Way to Maintain Your Shower
Let’s be honest for a second: nobody actually enjoys cleaning the bathroom. It’s usually the chore we kick down the road until we absolutely can’t stand looking at the grime anymore. And the biggest offender? Those glass shower doors. When they’re clean, the whole room looks like a five-star hotel. When they’re covered in that cloudy, white film, the whole vibe just feels... off. If you’ve been struggling to get that crystal-clear shine, don't worry. You don't need magic or a professional cleaning crew. You just need a better game plan. Learning how to clean glass doors is mostly about understanding what you’re up against and using the right tools for the job. Why Does My Shower Look So Cloudy? It’s frustrating, right? You take a shower to get clean, but the shower itself seems to get dirtier every time you use it. Most people think it’s just soap, but it’s actually a bit more scientific than that. First, you have hard water minerals. Depending on where you live in the USA, your water might be full of calcium and magnesium. When those water droplets dry on your glass, they leave the minerals behind. Over time, these build up into those annoying little white circles. If you want to remove water spots, you have to actually break down those mineral deposits. Then you have soap scum. This happens when the fats in your bar soap react with the minerals in the water. It creates a sticky, waxy layer that loves to grab onto everything-skin cells, hair, and dust. If you don't use a solid shower glass cleaner, you’re basically just moving that wax around instead of actually getting rid of it. The Essentials: What You Actually Need Before you start scrubbing until your arm hurts, let’s talk about your toolkit. You don't need a cabinet full of chemicals. In fact, some of the best stuff is probably already in your pantry. 1. The Right Scrubby Tool Stop reaching for the green scouring pads. You might think you're being tough on the grime, but you're actually leaving tiny scratches on the glass. Those scratches act like little "pockets" that trap even more dirt later. Stick to a soft microfiber cloth or a non-abrasive sponge. 2. A Reliable Squeegee If you don't have a squeegee yet, go get one. It is the single most important tool in this entire guide. It’s the difference between cleaning your shower once a week and cleaning it once a month. 3. The Best Shower Glass Cleaner You have two main choices here. You can go the DIY route or buy something off the shelf. The DIY Route: Mix equal parts white vinegar and water in a spray bottle. Add a few drops of blue dish soap (the kind used for greasy pots). The vinegar cuts the minerals, and the soap cuts the grease. It’s cheap, and it works. The Store-Bought Route: If the vinegar smell is too much for you, look for the best shower glass cleaner at the store. Look for brands that mention "dissolving minerals" or "water spot remover." The Deep Clean: Step-by-Step If your shower doors look like they’ve been through a sandstorm, a quick wipe won't cut it. You need to do a "reset" clean. Here is how to do it without losing your Saturday. Step 1: The Pre-Rinse Turn on the hot water for a minute to get the bathroom steamy. The heat helps loosen up the soap scum. Use your showerhead to rinse down the glass and get rid of any loose hair or surface dust. Step 2: Spray and Stay Spray your shower glass cleaner all over the door. Now, here is the secret: Wait. Don't start scrubbing immediately. Let the cleaner sit for at least 10 minutes. This gives the ingredients time to eat through the hard water buildup. If it starts to dry out, just spray a little more. Step 3: The Scrub Now that the gunk is softened up, take your microfiber cloth and work in circular motions. Start at the top and work your way down. You’ll feel the texture of the glass change as it gets smoother. Step 4: Focus on the Problem Areas To truly remove water spots that have been there for a while, you might need to apply a little more pressure. If the vinegar spray isn't doing it, make a paste out of baking soda and water. Rub it onto the spots, let it sit, and then wipe it away. The baking soda provides just enough grit to polish the glass without scratching it. Step 5: The Final Rinse Rinse everything off with cold water. Cold water doesn't create steam, so you can actually see if you missed any spots while the glass is still wet. How to Clean Hard Water Stains (The Heavy Duty Stuff) Sometimes, you move into a new place, and the shower looks like it hasn't been cleaned since the 90s. If the glass feels rough like sandpaper, you're dealing with serious mineral buildup. To clean hard water stains of this level, you might need a professional-grade acidic cleaner. Be careful with these, though-wear gloves and keep the door open for airflow. If you prefer to stay natural, lemon juice is a great alternative to vinegar. It’s highly acidic and smells a lot better. Just rub a cut lemon directly on the stains, let it sit, and rinse. The Secret to Never Scrubbing Again I’m going to let you in on a little secret. Professional cleaners don't have "magic" sprays; they just have better habits. If you want to clean glass doors less often, you have to stop the spots before they start. The 60-Second Squeegee Habit Every time you finish your shower, take your squeegee and wipe down the glass. It takes about one minute. By removing the water before it dries, the minerals never have a chance to stick. If the water isn't there, the spots can't form. It’s that simple. Use a Water Repellent. Once your glass is perfectly clean and dry, apply a glass treatment product (like the ones used on car windshields). It creates an invisible shield that makes water bead up and roll right off. It’s a total game-changer for keeping things low-maintenance. Common Mistakes People Make Using Dry Cloths on Dirty Glass: Never rub a dry cloth on a dry, dirty shower door. You’re just grinding the minerals into the glass. Always use a liquid cleaner to provide lubrication. Forgetting the Seals: Those clear plastic strips at the bottom of the door? They get nasty fast. Make sure to spray them with your best shower glass cleaner and use an old toothbrush to get into the grooves. Ignoring the Tracks: If you have a sliding door, the metal tracks at the bottom are usually full of standing water and soap. This is where mold starts. Dry them out after your shower to keep the bathroom smelling fresh. Why It Matters You might think, "It's just a shower door, who cares?" But taking the time to clean hard water stains is actually about protecting your home. If minerals stay on the glass for years, they can actually "etch" the surface. This means the minerals chemically bond with the glass, causing permanent damage that no amount of scrubbing will fix. At that point, your only option is to replace the glass, which can cost hundreds or even thousands of dollars. Cleaning it now saves you a massive headache (and a big bill) later. Plus, let’s be real, stepping into a crystal-clear shower just feels better. It makes your morning routine feel a little more like a treat and a little less like a chore. Wrapping It Up Keeping your bathroom looking great doesn't have to be your second full-time job. By using a simple vinegar mix or the best shower glass cleaner you can find, and spending sixty seconds with a squeegee every morning, you can keep that "just-cleaned" look for weeks at a time. Don't let the hard water win. Start with a deep clean this weekend to remove water spots, and then stick to the daily maintenance. Your future self will thank you when you don't have to spend three hours scrubbing on a Saturday.

Choose the Best Bathtub Shape for Your Bathroom Layout
Finding the right bathtub is like picking the right pair of shoes—it has to look great, but it also has to fit the space you actually have. If you’ve ever walked into a bathroom and felt like you were navigating an obstacle course, you know why layout matters. Choosing the Best Bathtub Shape is the most important part of your bathroom remodel. It’s the difference between a cramped room and a relaxing home spa. In this guide, we’ll break down how to pick a tub from a modern bathtub collection that fits your home perfectly. Why the Shape of Your Tub Matters When you look at a bathroom, the bathtub is usually the biggest item in the room. If the shape is wrong, the whole room feels "off." The Best Bathtub Shape is one that leaves you enough room to walk, open the door, and reach the sink without bumping your knees. Most people think about the length of the tub first, but the shape (the footprint) is what determines how much floor space you lose. Whether you want a sharp, modern look or something soft and rounded, the shape should work with the lines of your walls. Luxury Styles for Big and Small Rooms You don’t need a giant mansion to enjoy luxury bathtubs. Today, luxury is more about the design and the "feel" of the soak than just the size of the room. The Beauty of Standing Alone If you want your bathroom to look like a high-end hotel, freestanding bathtubs are the way to go. These tubs don't need to be attached to a wall. Because these bathtubs can sit anywhere, they give you the freedom to get creative with your layout. You can even angle them toward a window to enjoy the view while you soak. Bringing Back the Classics For a vintage or farmhouse vibe, the claw foot bathtub is a timeless winner. These tubs sit on four decorative legs, leaving the floor underneath completely visible. This is a great trick for small bathrooms because seeing more of the floor makes the room feel much airier and less crowded. Practical Shapes for Busy Families Sometimes, you just need a tub that gets the job done without taking up too much room. This is where "built-in" shapes are lifesavers. The Reliable Alcove Setup The alcove bathtub is the most popular choice in the USA. It’s designed to fit into a three-walled nook. It’s a massive space-saver because it stays out of the way, leaving the middle of the floor open. An alcove bathtub is also perfect if you need to combine your tub and shower into one spot. The Strength of Acrylic No matter what shape you choose, the material matters. An Acrylic Bathtub is a smart choice for almost any layout. Since acrylic is easy to mold, you can find an Acrylic tub in almost any shape, from square to circular. Plus, they are lightweight, so they are easy to install on the second floor of a home. 4. Finding the Perfect Shape for Relaxing If you love long baths, you need a Soaker Bathtub. These are deeper than standard tubs, allowing the water to cover your shoulders. But a Soaker Bathtub only works if the shape matches your body’s natural curves. Why Ovals are So Popular The Oval Tub is often called the most comfortable shape in the world. Since humans aren't shaped like rectangles, the rounded ends of an Oval Tub cradle your back and shoulders perfectly. It’s the ultimate shape for a long, quiet soak after a stressful day. If you want that rounded look but don't want a tub on "legs," a Pedestal Bathtub is a great alternative. A Pedestal Bathtub sits on a solid base (or plinth), giving it a very sturdy and expensive look. It’s a great focal point for a master suite. The Visual Power of the Curve Choosing an Oval Bathtub isn't just about comfort; it's about style. In a room full of square tiles and rectangular vanities, an Oval Bathtub breaks up the hard lines and makes the space feel softer and more inviting. It’s a simple design trick that makes a big impact. 5. Quick Tips for Picking Your Tub Before you finalize your order from a bathtub collection, keep these simple things in mind: Check the Drain: Moving pipes is expensive! Make sure the tub’s drain hole matches where your pipes are now. The "Walk-Around" Space: Use blue tape on your floor to mark where the tub will go. Make sure you can still walk past it comfortably. Weight Matters: Make sure your floor is strong enough for a full tub of water, especially if you pick a heavy stone or metal style. Quick Comparison: Which Tub Fits Your Life? This table helps you compare the most popular choices at a glance. Tub Type Best For Space Needed Comfort Level Alcove Bathtub Small bathrooms / Kids Low (fits in a nook) Standard Freestanding Bathtubs Large bathrooms / Style High (needs floor space) High Claw foot bathtub Vintage & Classic looks Medium High Oval Tub Deep soaking & Comfort Medium Excellent Pedestal Bathtub Modern & Stately looks Medium to High High The Classic Alcove: Great for Small Spaces The alcove bathtub is the one most of us grew up with. It is designed to fit into a three-walled space in your bathroom. Because it stays tucked away against the wall, it leaves more floor space for you to walk around. Pros: Very affordable and saves a lot of space. It's also the easiest to clean because only one side is exposed. Cons: It can feel a bit "plain" and isn't always deep enough for a full-body soak. Freestanding Tubs: The Style Icons If you want your bathroom to look like a spa, freestanding bathtubs are the way to go. These tubs don't need to be attached to walls. You can place them in the middle of the room or near a window for a beautiful view while you soak. Pros: They look like a piece of art and give you total freedom on where to put them. Cons: They need more room (you usually want space all the way around them) and can be a little expensive to install. Luxury Bathtubs: Ultimate Relaxation When we talk about luxury bathtubs, we mean tubs that are designed for pure comfort. These often have thicker walls to keep the water warm and ergonomic shapes that support your back. Pros: They stay warm for a long time and make your home feel more valuable. Cons: They are often heavier and might require a bit more plumbing work. Why Material Matters: The Acrylic Choice Most modern tubs are an Acrylic Bathtub. This material is a favorite because it is lightweight but very strong. Pros of an Acrylic Bathtub: It is warm to the touch (unlike metal tubs that start cold) and very easy to wipe clean. It also won't rust or chip easily. Cons: While tough, it can be scratched if you use very harsh, abrasive cleaners. Shapes for Soaking: Ovals and Pedestals If you love taking long baths, you should look for a Soaker Bathtub. These are deeper than standard tubs, so you can be fully covered by the water. The Oval Tub The Oval Tub is famous for being the most comfortable. Because our bodies aren't square, the rounded edges of an Oval Bathtub cradle your shoulders and back perfectly. Pros: Very comfortable and looks soft and inviting in the room. Cons: Can be trickier to fit into a tight corner than a rectangular tub. The Pedestal Style A Pedestal Bathtub is a freestanding tub that sits on a solid base rather than legs. It looks very solid and modern. Pros: It hides all the plumbing inside the base for a very clean look. Cons: It is usually quite heavy and takes up a good amount of floor space. Vintage Charm: The Clawfoot The claw-foot bathtub is a timeless classic. It sits on four decorative feet, which gives it a fancy, old-world look that people love. Pros: Makes a huge design statement and leaves the floor underneath visible, which can make a small room feel bigger. Cons: Harder to clean underneath and usually requires a special "floor-mounted" faucet. Summary: How to Choose the Best Bathtub Shape To find the Best Bathtub Shape, look at your floor first. If you have a small, narrow room, the alcove bathtub is your best choice. If you have a big master suite and want a "wow" factor, go for freestanding bathtubs in an Oval Bathtub style. Remember that a high-quality bathtub collection will offer different sizes in each of these shapes. No matter which you choose, opting for a Soaker Bathtub made from a durable Acrylic Bathtub material will ensure you have a relaxing spot to unwind for years to come. Whether you love the look of a Pedestal Bathtub or the history of a claw-foot bathtub, your perfect bath is out there!

The Benefits and Costs of Installing Bathtub Glass Doors?
If you’re currently staring at a plastic shower curtain that’s seen better days, you’ve probably wondered if it’s time for an upgrade. Let's be honest: shower curtains are kind of a pain. They get gross quickly, they never stay in place, and they make a nice bathroom look a bit "cheap." Making the switch and installing bathtub doors is one of the quickest ways to make your bathroom feel like a grown-up space. It’s like giving the room a facelift without the mess of a full demo. But before you run to the store, you probably want to know what you’re getting into regarding the price and the work involved. Why Even Make the Switch? The biggest reason people look into installing bathtub doors is the look. Glass makes a tiny bathroom feel way bigger because your eyes can see all the way to the back wall. It lets the light flow through, so you aren't showering in a dark little cave. Plus, there’s the "splash factor." If you have kids or a high-pressure showerhead, curtains always seem to let a little water escape onto the floor. A solid glass door creates a real seal. No more soggy bath mats or worrying about water damage on your baseboards. What About the Price Tag? Let's talk about the elephant in the room: glass door costs. Unlike a $15 curtain from a big-box store, glass is an investment. You’re paying for the tempered safety glass, the metal tracks or hinges, and the labor to get it perfectly level. Generally, glass door costs can land anywhere from a few hundred bucks for a basic DIY kit to over a thousand for something custom. While that might feel like a lot upfront, think about it this way: you aren't replacing it every six months because it smells like mildew. It’s a "one and done" purchase that actually adds value to your home if you ever decide to sell. Pick Your Style: Frameless Glass Doors If you’ve been scrolling through Pinterest or home decor magazines, you’ve definitely seen frameless glass doors. These are the ones that look like they’re just floating there. There’s no thick metal frame around the edges, which gives the bathroom a super clean, high-end look. People love frameless glass doors because they’re a breeze to clean. Since there isn't a metal track at the bottom to catch hair and soap scum, you just wipe the glass, and you're done. They do cost a bit more because the glass has to be much thicker to stay sturdy without a frame, but for most people, the "spa vibe" is worth the extra cash. Modern Bathtub Doors: More Than Just Clear Glass You aren't stuck with the boring sliding doors from your grandma’s house anymore. Modern bathtub doors come in some really cool finishes now. Matte black hardware is huge right now, and so is brushed gold. It’s an easy way to match your sink faucet and towel racks for a cohesive look. Some modern bathtub doors also come with "pivot" hinges, meaning they swing open like a regular door. This is great if you need to reach in to turn the water on for a kid's bath without getting your arm soaked. Choosing the Right Bathtub Glass Doors When you start shopping, you’ll realize there are a lot of options for the actual panels. Bathtub glass doors aren't just clear; you can get frosted glass if you want some privacy, or "rain" glass, which has a cool texture that hides water spots really well. The best part about high-quality bathtub glass doors is the safety. They use tempered glass, which is incredibly strong. Even if the unthinkable happens and it breaks, it crumbles into tiny dull pebbles instead of sharp shards. It’s built to handle the chaos of a busy family bathroom. Is it a DIY Job or Should You Call a Pro? You might be tempted to save some money and do the heavy lifting yourself. If you’re just putting up a simple sliding track, you might be fine. But glass is way heavier than it looks. If you’re putting in bathtub glass doors, having a second set of hands is a must. One tiny slip can lead to a very expensive mess on your floor. Calling a pro ensures the door slides perfectly and doesn't leak. Keeping It Looking New Once the job is done, you want to keep that shine. The secret? Use a squeegee. It takes ten seconds after you shower, but it stops hard water stains before they even start. If you do that, your modern bathtub doors will look just as good five years from now as they do today. Final Thoughts At the end of the day, switching from a curtain to glass is a total game-changer. It makes your morning routine feel a bit more luxurious and keeps your bathroom drier and cleaner. Whether you want the sleekness of frameless glass doors or the reliability of a classic slider, it’s a home project you won't regret.

How to Clean a Shower Enclosure to Extend Its Lifespan
A shower enclosure gets used every single day, yet it’s often the last thing people think about maintaining. Over time, soap residue, water spots, and moisture quietly build up. Left alone, they can dull the glass, damage hardware, and shorten the life of the enclosure. The good news? Keeping your enclosure looking new doesn’t require special tools or hours of effort. With a few smart habits, you can protect everything from the glass to the rollers. This matters whether you’re using a basic setup, full shower kits, or a high-end luxury shower enclosure. Let’s keep this simple and practical. Why Regular Cleaning Makes Such a Difference A clean enclosure isn’t just about looks. It affects how smoothly the doors move, how long seals last, and how fresh your bathroom feels. When cleaning becomes part of your routine, you: Keep glass clear instead of cloudy Prevent rust and corrosion on metal parts Avoid stiff or noisy doors Extend the life of seals and rollers Maintain a cleaner, healthier bathroom If you’ve invested in complete shower enclosure kits, proper care helps protect that investment long term. Start by Knowing Your Shower Enclosure Before cleaning, it helps to understand what your enclosure is made of. Glass Panels Most enclosures use tempered safety glass. Clear glass shows water spots more easily, while frosted or textured glass hides them a bit better but still needs regular cleaning. Frames and Hardware Framed and semi-frameless enclosures include metal edges and trims that should be cleaned gently to avoid scratches. Frameless styles rely heavily on spotless glass and clean hardware to look their best. Tracks and Seals Sliding doors, common in many shower kits, depend on clean tracks. Rubber seals keep water inside and need attention to prevent mold and wear. Daily Habits That Save You Time Later Here’s the thing: the easiest way to clean a shower enclosure is to stop buildup before it starts. After each shower: Run a squeegee over the glass Wipe down handles and metal edges Leave the door slightly open to let moisture escape It takes less than a minute, but it makes weekly cleaning much easier. A Simple Weekly Cleaning Routine Once a week, give your enclosure a proper clean. This keeps it looking good and working smoothly. Clean the Glass Use a mild, non-abrasive cleaner and a soft cloth. Spray lightly, wipe gently, and dry the glass to avoid streaks. Harsh chemicals and rough pads do more harm than good. Wipe the Frames and Hardware Soap residue loves metal surfaces. Wipe frames, hinges, and handles with a damp cloth, then dry them right away. This is especially important if you have a luxury shower enclosure with premium finishes. Check Sliding Tracks If your enclosure slides, inspect the bottom track. Remove hair, soap buildup, and debris. Clean tracks mean smoother doors and fewer problems over time. Monthly Checks That Prevent Bigger Issues Once a month, take a closer look. Check rubber seals for mold or cracks Clean corners where grime tends to hide Make sure handles and hardware are secure Pay attention to how smoothly doors move Catching small issues early can save you from costly repairs later. What Not to Do When Cleaning Some common habits can shorten the life of your enclosure. Avoid: Scrubbing with abrasive pads or steel wool Using strong bleach or acidic cleaners Letting cleaning products sit too long Ignoring moisture around seals and frames Gentle cleaning always works better in the long run. How Cleaning Protects Shower Enclosure Kits Regular cleaning doesn’t just keep things shiny. It keeps everything working as it should. Clean glass resists permanent stains. Dry hardware resists rust. Flexible seals last longer. If your bathroom includes complete shower enclosure kits, this kind of care helps every part perform better for longer. Extra Care for Luxury Shower Enclosures A luxury shower enclosure is designed to look refined, so a little extra care goes a long way. For best results: Stick to gentle cleaners Dry metal finishes after cleaning Keep hinges and tracks clean Make sure your bathroom is well-ventilated These small habits help preserve that polished, high-end look. Long-Term Maintenance Tips That Actually Work If you want your enclosure to stay in great shape: Clean it consistently, not occasionally Replace worn seals as soon as you notice them Fix stiff doors before they get worse Reduce moisture with proper airflow Simple habits make a big difference over time. FAQs How often should I clean my shower enclosure? Light cleaning once a week, plus quick daily wipe-downs, works best. Can I use regular household cleaners? Mild cleaners are fine. Avoid anything harsh that could damage glass or finishes. How do I stop water spots from forming? Using a squeegee after every shower is the most effective method. Are sliding shower enclosures harder to maintain? They need a bit more attention in the tracks, but regular cleaning keeps them smooth. Does cleaning really extend the lifespan? Yes. It protects glass, hardware, and seals from early wear and damage. Final Thought A shower enclosure is something you rely on every day, so taking care of it is worth the effort. With the right routine, it can stay clear, smooth, and good-looking for years. If you’re thinking about upgrading or exploring modern shower kits and shower enclosure kits, Dreamwerks offers well-designed options that balance style, durability, and easy maintenance. Take a look through the collection and choose an enclosure that fits your space and your lifestyle.

What You Should Know Before Buying a Clawfoot Bathtub
A clawfoot bathtub has a certain charm that never really goes out of style. It’s the kind of piece that instantly shifts a bathroom from ordinary to memorable. If you’ve been thinking about adding one to your home, it helps to understand what you’re getting, how much it might cost, and what options give you the best balance of comfort, durability, and design. Here’s the thing: a clawfoot bathtub isn’t just another fixture. It’s a centerpiece. And when you pick well, it stays beautiful for years. Why Clawfoot Bathtubs Still Matter People love clawfoot tubs for the comfort, the elegance, and the way they work with both vintage and modern spaces. They’re deeper than most standard tubs, so soaking actually feels like a break instead of a squeeze. You get that spa-like feel without changing the rest of your bathroom. Dreamwerks offers styles that fit different tastes. Some lean toward the classic silhouette, while others feel more contemporary with cleaner lines and smoother edges. Explore it now at Dreamwerks for $999.99. Click Here. Let’s Talk About Cost If you’re using How much does a clawfoot tub cost as your starting point, you’re already asking the right question. The answer depends on three things: the material, the size, and the overall design. Acrylic models tend to be the most popular because they’re lighter, easier to maintain, and more affordable. Cast iron looks incredible, but it is heavier and usually costs more. Based on the designs you’ll find at Dreamwerks, most modern homeowners lean toward acrylic because it delivers the look without adding installation headaches. Expect prices to vary, but generally, acrylic options give you the best balance of beauty and practicality without stretching your budget. The Acrylic Clawfoot Oval Tub Advantage If you want something elegant but still manageable, an Acrylic Clawfoot oval tub is a smart pick. The oval shape feels more organic, gives you better support while soaking, and blends well with almost any interior style. Acrylic also stays warm longer, cleans easily, and isn’t as heavy as older clawfoot tubs. That means installation is simpler, and you don’t need to worry about reinforcing the floor. Dreamwerks carries acrylic tubs with smooth finishes, sculpted feet, and high-quality construction that feels solid without being difficult to handle. Explore it now at Dreamwerks for $999.99. Click Here. What Makes This Style Worth It A clawfoot bathtub has its own personality. It doesn’t sit hidden against the wall. Instead, it stands proudly in the room, and that alone changes the entire vibe. Here’s what people appreciate most: It makes the bathroom look more open Soaking is more comfortable because of the tub depth Cleaning around it is easier It adds long-term design value to the home If you’re thinking of styling your bathroom around the tub, this is one piece that sets the tone immediately. Choosing the Right Tub Size You’ll want to consider length, width, and depth. Taller people prefer deeper models. If your bathroom is wider, an oval tub with extended edges creates a nice, balanced look. Small bathrooms can still pull off a clawfoot design as long as you choose a size that leaves space to walk around comfortably. Check the dimensions of the tubs available at Dreamwerks, and think about how much open space you want once the tub is installed. Explore it now at Dreamwerks. Click Here. Maintenance and Care Clawfoot tubs don’t require complicated upkeep. Acrylic versions especially stay bright and smooth with simple cleaning. Avoid harsh chemicals and rough scrubbers. A soft cloth and mild cleaner will keep the finish looking new. If you choose polished feet or metal accents, wipe them occasionally to avoid water spots and preserve the shine. How to Make It the Star of Your Bathroom A clawfoot bathtub shines when the space around it supports the look. A freestanding faucet, warm lighting, a soft bath mat, and maybe a plant or two can make the tub feel like it belongs in a boutique spa. Even in a minimalist room, it draws attention in the best way. Dreamwerks offers several tubs that already carry that sculpted, luxurious silhouette, so all you need to do is style the space around them. Why Buy From Dreamwerks You get quality materials, comfortable designs, and tubs that look like they belong in premium homes without the premium stress. The Dreamwerks bathtub collection leans toward modern takes on the classic clawfoot style—lighter, cleaner, and easier to maintain. If you want something timeless without feeling overly traditional, their Acrylic Clawfoot oval options are definitely worth a closer look. FAQs 1. Are clawfoot bathtubs comfortable? Yes. They’re deeper than most standard tubs, so soaking feels more relaxing and spacious. 2. Is an acrylic clawfoot tub durable? Acrylic is strong, lightweight, and resistant to discoloration. It also retains heat well. 3. How hard is it to install a clawfoot bathtub? Acrylic models are easier to install because they’re lightweight. You usually don’t need structural reinforcement. 4. Do clawfoot tubs work in small bathrooms? They can. As long as you choose the right size and leave enough room around the tub, the look still works beautifully. 5. Are clawfoot tubs worth the cost? If you want comfort, style, and a long-lasting upgrade, yes. They add visual impact and boost the feel of the entire bathroom. Final Thought A clawfoot bathtub is one of those upgrades that never stops feeling special. With acrylic oval designs and modern finishes available at Dreamwerks, you can create a space that feels both classic and current. Take a look at the collection and find the one that fits your style.

The Best Shower Doors to Upgrade Your Bathroom
The Best Shower Doors to Upgrade Your Bathroom Let’s be honest: a bathroom only feels complete when the shower area looks clean, modern, and intentional. And that usually comes down to one thing — the shower door. It’s a small upgrade on paper, but in reality, it changes how the entire room looks and feels. If you’re browsing options from Dreamwerks, you’ll find plenty of choices, from clear tempered glass shower doors to sleek frameless setups and practical sliding systems. Here’s the thing. A well-chosen door isn’t just about style. It affects safety, comfort, maintenance, and how spacious the room feels. Pick the right design and your bathroom immediately feels brighter and more put-together. Let’s walk through everything you should know so you can match your space with the right door from the Dreamwerks collection. Why Shower Doors Make Such a Difference A good shower door does more than keep water where it belongs. It anchors the entire bathroom. Clear glass shower doors open up the space. Frosted versions add privacy. Frameless styles bring that modern, spa-like feeling. And because Dreamwerks uses durable, certified tempered glass, you’re getting something built to last. If your bathroom feels dark, cluttered, or dated, switching the door alone can completely shift the mood — no renovation needed. Dreamwerks Shower Door Collection: What to Buy and Why 1. 60 x 79 Bypass Semi-Frameless Corner Shower Door – Clear Glass Price: $ 549.99 Why You’ll Love It:This semi-frameless bypass door is made for anyone who wants their bathroom to feel bright, open, and clean without going fully frameless. The clear glass keeps the space airy, and the smooth-glide sliding system makes every shower feel effortless. It’s a practical upgrade that still looks polished and modern from every angle. Key Highlights: Semi-frameless design with clear, spacious-feeling glass Easy-glide bypass sliding system Ideal for corner installations Sturdy, long-lasting hardware A clean, minimal style that suits almost any bathroom Explore it now at Dreamwerks for $549.99. Click Here. 2. 40 x 79 Shower Screen in Black – Clear Glass Price: $ 356.99 Why You’ll Love It:This shower screen is perfect if you love a minimal, European-inspired look. The matte black frame creates just the right amount of contrast, while the clear glass keeps the entire room feeling open. It’s a great pick for walk-in showers where you want style and simplicity working together. Key Highlights: Sleek black frame for a bold, modern touch Clear glass that keeps the space bright and open Ideal for walk-in or open-concept shower designs Low-maintenance layout with no moving doors Easy installation for a quick bathroom upgrade For anyone who wants modern style with zero clutter, this screen hits the mark. Explore it now at Dreamwerks for $356.99. Click Here. 3. 36 x 79 Framed Sliding Shower Enclosure – Bright Chrome, Frosted Glass Price: $ 524.99 Why You’ll Love It:If privacy matters but you still want a clean look, this framed enclosure is a perfect match. The frosted glass adds softness and discretion, while the bright chrome frame gives it a polished, refined touch. The sliding system is smooth and reliable, making it ideal for smaller bathrooms where every inch counts. Key Highlights: Frosted glass for comfortable, built-in privacy Bright chrome framing for a clean, polished finish Smooth sliding door system Great for compact spaces with limited swing clearance Durable build that stays looking sharp over time Explore it now at Dreamwerks for $524.99. Click Here. 4. 60 x 60 Framed Bypass Shower Door – Polished Chrome Price: $ 349.99 Why You’ll Love It:This framed bypass door blends simplicity with reliability. The polished chrome frame adds a classic touch that works with almost any bathroom style. The dual sliding panels make the shower easily accessible from either side, and the design is built to handle everyday use with ease. Key Highlights: Timeless polished chrome finish Dual bypass sliding doors for easy access Great for mid-sized shower spaces Durable framing for long-lasting stability Clean, straightforward design that fits any bathroom look Explore it now at Dreamwerks for $349.99. Click Here. What Makes Dreamwerks a Solid Choice Dreamwerks focuses on durability and everyday comfort. Their doors feature: Thick tempered glass shower doors Smooth rollers and high-quality hinges Corrosion-resistant metal trims Clean, modern design language Options for small bathrooms, larger walk-ins, and tub setups You’ll notice the difference the moment you touch the hardware. How to Choose the Right Shower Door for Your Space Before you settle on a design, here’s what really matters: Measure your space properlyThe width, height, and available clearance decide whether you should pick sliding, frameless, or tub doors. Think about privacyClear glass brightens the room. Frosted or patterned glass keeps things subtle. Match the lookIf your bathroom is modern, frameless works beautifully. If you want something practical, sliding doors are dependable. For a tub, a dedicated set of shower tub doors is the cleanest option. Consider maintenance.Less hardware means less cleaning. Smooth glass with protective coatings also saves time. Go for durability.Tempered glass, strong rollers, and rust-resistant parts aren’t upgrades — they’re essentials. Popular Dreamwerks Models Worth Checking Out Here’s a simple guide to the types of products you’ll find in the Dreamwerks shower door collection: Semi-Frameless Sliding Doors A balance of style and practicality. The glass is clear and modern, and the sliding panels move smoothly. Frameless Bypass Doors Great for walk-in showers. They give you that airy, open look with barely-there hardware. Tub-Shower Door Sets Perfect for families and everyday use. The design is simple, strong, and far more hygienic than a curtain. Each category includes multiple sizes, so you can match your bathroom layout without stress. Why Upgrading Your Shower Door Is Worth It Here’s what you gain when you invest in a new Dreamwerks door: A cleaner, brighter bathroom Clear panels make even small rooms feel bigger. Better safety Tempered glass shower doors are designed to break into tiny pieces if stressed. Easier cleaning Smooth glass, simple tracks, minimal metal — cleaning becomes a quick weekly task. Improved home value Buyers notice quality fixtures, especially in bathrooms. More comfort A door that glides smoothly and seals properly makes your daily routine feel better. Simple Styling Tips You don’t have to spend a lot to make the space look finished. Try these: Add a matching black or chrome shower set Use warm lighting or an LED mirror Keep shampoo bottles organized Stick to soft, neutral colors Small touches go a long way. FAQs 1. Are frameless shower doors better? They offer a cleaner look and make the bathroom feel larger. They rely on thicker, stronger glass for stability. 2. Do sliding doors work for small bathrooms? Absolutely. Since they don’t swing open, they save space and keep the layout functional. 3. Why is tempered glass important? It’s much stronger than regular glass and breaks safely, reducing injury risk. 4. Can I add doors to a bathtub? Yes. A good set of shower tub doors instantly makes a tub-shower combo look tidier and more modern. 5. Are Dreamwerks shower doors easy to clean? Yes. Their glass and hardware are designed to resist stains and water spots, making upkeep simple. Final Thoughts A shower door might seem like a small detail, but it changes everything about how a bathroom looks and feels. Whether you’re drawn to frameless styles, sliding systems, or tub-friendly designs, the Dreamwerks collection makes it easy to find something that fits your space and your style. You can also check the Dreamwerks blog Is a Black Shower Door the Best Upgrade for Your Bathroom for more ideas. It’s a great reminder of how the right shower door can elevate your entire space.